Tuesday, December 24, 2013

12 Cosplays of Christmas - 12 Bells A-Jingling (Santa uniform)

Day 12! ^^ This is it, people! The last recipe of 12 Cosplays of Christmas 2013! Now, for you big and small kids out there, who's coming down the chimney tonight? Santa, of course! ^^ Why do I bring this up? Because to send this sleigh back to the North Pole until next year, I'm doing the second part to my recipe of Mai from 'Itsudatte! My Santa!' Since I already posted her uniform yesterday, today I'm posting a recipe of her Santa suit along with her friends'.

Here's a cover of the Funimation dub of the OVA. ^^ We'll cover the other girls, too!
 
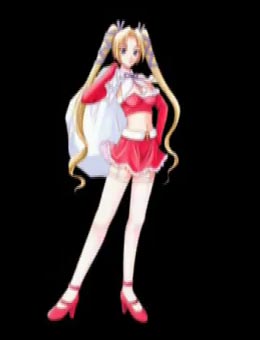
Here's the other Santa girl, Sharry! ^^ Many thanks to the Love Hina Wiki for letting me use this!
 
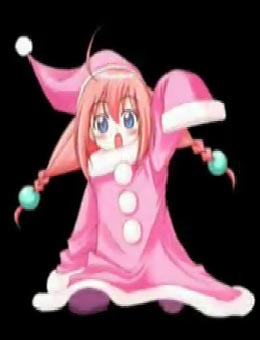
Here's the younger Santa girl, MaiMai! ^^ Ain't she cute? This can be the kids' suit. Again, many thanks to the Love Hina Wiki for letting me use this!
 
There's several ways to make this type of costume, so feel free to do whatever style you want. Here's what you need to assemble the girls:
  • A red strapless dress *Mai*
  • A pink belt *Mai*
  • Red boots *Mai*
  • A red strapless bra *Sharry*
  • A red skirt *Sharry*
  • Long white socks *Sharry*
  • Red Mary Jane heels *Sharry*
  • A white sheet *Sharry*
  • White ribbon *Sharry*
  • A long pink dress *MaiMai*
  • Large white pom-poms (sold at craft stores like Michael's, JoAnn, WalMart, etc.)
  • Long red gloves
  • White faux fur
  • A red or pink Santa hat (sold in most stores during this season)
  • Fabric glue
Much like the 'Homestuck' Trolls, we'll focus on the uniform stuff. Here's how to assemble them:
  1. Have somebody line the dress or bra and skirt with the fur and pin it on. They can sew it on or you can sew it on yourself. Do the same for the gloves, hem and cuffs (if you're doing MaiMai).
  2. Afterwards, glue on the pom-poms onto the dress and wait until the glue dries. You can sew these on too, but it's best sewn by hand.
  3. If you're doing Sharry, draw a zigzag shape onto the sheet, cut it out, line the top with ribbon and sew it on. Tie the cape around your neck once you're done. This works better if you drape it over your shoulders and measure it first before drawing the shape.
  4. For Sharry's hair, simply tie your hair into pigtails with strips of ribbon and entwine them in your hair.
  5. For MaiMai's hair, part your hair and tie the bottom part of the pigtails using a close-to-hair-color hairband. Braid the bottom and finish with a beaded hair tie.
  6. Get the rest of the costume on (belt for Mai, socks and heels for Sharry), grab your Santa hat and now you're done!
Sadly, I don't have a recipe for New Year's... However, I will make another post when I return next year for Valentine's Day. Hope you've enjoyed this and 12 Cosplays of Christmas 2013! Oh, one more thing before I'm gone for a month...
 
Have a Merry Christmas 201and a Happy New Year 2014!!! *<^(w)^ .o*

Sunday, December 22, 2013

12 Cosplays of Christmas - 11 Books A-Stacking (Mai *uniform*)

Day 11! ^^ One more recipe! I'll be closing this year's '12 Cosplays of Christmas' with two-parter costume recipes. Unlike the ones I did for V-tine's Day and White Day, I won't be posting these together on the same day. Instead, I'll post one today and post the second tomorrow. Also, instead of a couple, it's two forms of the same character.

Anyway, grab your coats and prep for the cold weather because today's character is Mai from 'Itsudatte! My Santa!'

Here's a picture of Mai and her two forms. ^^ I'll be covering her Santa form, too!
 
Here's what you need:
  • A white Polo shirt
  • A red or brown tie
  • A yellow buttoned sweater
  • An orange plaid skirt
  • White socks
  • Brown loafers
  • Red ribbon
There's not that many instructions for it. Just simply:
  1. Get dressed.
  2. Put your hair behind you, using the ribbon as a headband.
  3. For extra cuteness, bring a reindeer or moose plush with you and you're done!
Hope you've enjoyed! ^^
 
Last line: 12 Bells A-Jingling!!

Saturday, December 21, 2013

12 Cosplays of Christmas - 10 Eggs A-Hatching (Shugo Chara uniform)

Day 10! ^^ Only 2 recipes left! Today, let's make an omelet and not break any eggs because today, it's the uniform from 'Shugo Chara.'

Here's a picture of (almost) everybody! ^^
 
What you need to assemble the uniforms:
  • Sheets of plaid fabric *red for girls, blue for boys*
  • Thick ribbon *red for girls, blue for boys*
  • A white long-sleeved shirt
  • A black dress jacket
  • Matching plaid bottoms *red skirts for girls, blue shorts for boys*
  • White socks
  • Any boots or shoes
Since this one's very short, I'll keep it brief. Here's how to assemble it:
  1. Get dressed and roll the shirt cuffs over those of the jacket.
  2. Drape the fabric over your shoulders and pin some ribbon onto the collar of the fabric. Somebody can sew the ribbon for you.
  3. Once the ribbon is sewn on, tie it to your neck, grab an large Easter egg and now you're done!
Hope you've all enjoyed! ^^
 
Next line: 11 Books A-Stacking!

Friday, December 20, 2013

12 Cosplays of Christmas - 9 Buckets A-Clanking (Trolls)

Day 9! ^^ 3 more recipes! Today, it's the Trolls from 'Homestuck!'

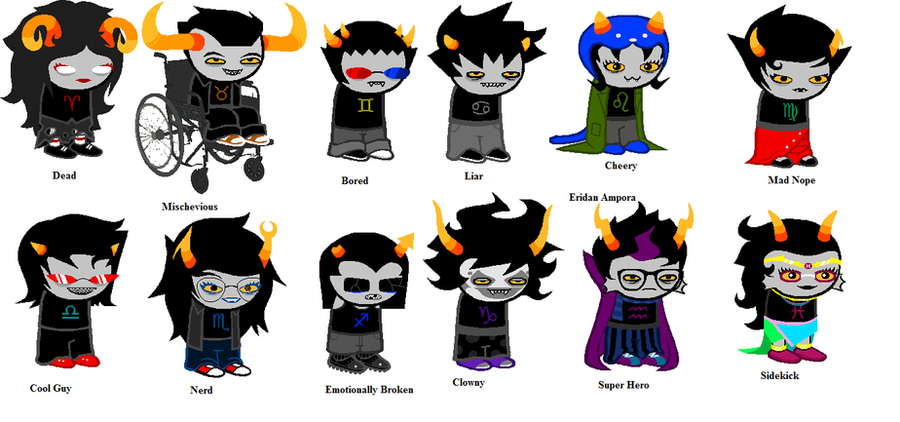
Here they are! ^^ (L-R: Aradia, Tavros, Sollux, Karkat, Nepeta and Kanaya *top*, Terezi, Vriska, Equis, Gamzee, Eridan and Fefer *bottom*) Many thanks to WeirdNerd of deviantART for letting me use this!
 
Since there's so many of these characters, I decided to just focus on the uniform stuff needed. Here's what you need:
  • A black shirt (tank top for Equis, t-shirt for everybody else)
  • Bottoms of any color
  • Colored duct tape
  • Cardboard or posterboard
  • Scissors
  • Black headband (horseshoe style works better then regular stretchy bands)
  • Black and colored hairspray
  • Gray and black face paint
Assembling them is pretty easy, but here's the directions anyway:
  1. Let's start with the horns first. Cut out some cardboard or posterboard and cover the pieces with yellow, orange and red duct tape. Then tape them to the headband and set them aside for after you're done.
  2. Get dressed. Much like the horns and later the makeup, it depends on what Troll you wanna be.
  3. Now for the cosmetics! For the hair, spray some of the black hairspray on your hair (some purple if you're gonna be Eridan).
  4. For the makeup, apply some gray face paint on yourself. Mix some of that paint and a bit of black to make a darker shade of gray and apply that sparingly on your face.
  5. Grab any accessories for your Troll (glasses, tiaras, scarves, etc.) and now you're done! ^^
By the way, folks, I'll be gone early tomorrow, so I'll be posting #10 around midnight and #11 late the following night. Until then, I'm pulling double-duty and getting the rest done, so you guys won't be disappointed. Anyway, hope you've enjoyed!
 
Next line: 10 Eggs A-Hatching!

Thursday, December 19, 2013

12 Cosplays of Christmas - 8 Bouquets A-Tossing (Wedding Peach uniform)


Day 8! ^^ 4 recipes left! Today, let's smell the flowers, hear the bells and gorge on some cake because today's characters are the 'Wedding Peach' girls!
 
Here are the girls! ^^ (L-R: Angel Daisy, Scarlet O'Hara *she really doesn't have a Love Angel name! ^^;*, Wedding Peach and Angel Lily)
Here's what you need for them:
  • Gold felt or fabric (satin or silk looks a lot better!)
  • Yellow ribbon *Wedding Peach*
  • A red dress *Wedding Peach*
  • A white skirt
  • A leotard of any color
  • White bra cups (yes, those exist and are sold separately, ladies!)
  • Any shoes or boots
  • Scissors
You can pick whatever color you want for the leotard, but if you want to be a specific character:
  • Daisy - yellow
  • Scarlet - purple
  • Peach - red
  • Lily - blue
How to assemble the team:
  1. Put on the leotard, the white skirt and the cups. For best results, the cups should be sewn on by hand or get some heavy-duty tape to keep them on. For Peach, put on a red skirt, cut part of the white skirt off and put them on.
  2. Cut out some of the felt for the trim (i.e. shoulder armor, garters, etc.). Apply them to the appropriate areas according to the picture.
  3. Grab whatever boots or shoes you have, do your hair however you want it and now you're done! ^^
Next line: 9 Buckets A-Clanking!

Wednesday, December 18, 2013

12 Cosplays of Christmas - 7--WHATEVERS2009!!

Day 7! ^^ Oh, my glob! We've hit the week mark! Today, we'll be doing yet another humanization costume. Last year, we did Pinkie Pie from MLP; this year, it's everybody's favorite valley-cloud, Lumpy Space Princess from 'Adventure Time!'

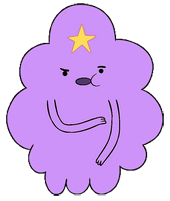
Here's a picture of LSP. ^^ We'll use the lumps as a model for the costume. Many thanks to the Adventure Time Wiki for letting me use this!
 
Here's what you need to lump yourself up:
  • A purple fluffy dress
  • Purple color hairspray
  • Purple gloves (optional)
  • Barrettes
  • Yellow felt
  • A curling iron
  • Purple face paint
  • Scissors
How to become lumpy:
  1. Put on the dress and if there's any kind of fluffy stuff on it (feathers, lace, petticoats, etc.), ruffle it up.
  2. Now for the hair! Simply heat up the curling iron and begin curling when it's ready. If your hair's naturally curly, you can skip this step. Have somebody spray your hair purple after curling it.
  3. For the little star, simply cut out a star shape out of the felt. Open a barette, glue the star to it and leave it to dry.
  4. While waiting for the glue to dry, have somebody paint your face purple. Same for the arms if you don't have any purple gloves.
  5. Once the glue's dry, clip the barrette onto your hair and now you're done!
Hope you, like, totally enjoyed this recipe! Oh, glob, mah beans! O.Q

Next line: 9 Bouquets A-Tossing!

Tuesday, December 17, 2013

12 Cosplays of Christmas - 6 Ribbons A-Twirling (Jeanne)


Day 6! ^^ We have hit the halfway mark, folks! Today, we'll be doing Jeanne from 'Kamikaze Kaitou Jeanne!'
 
Here's a pic of her! ^^ Many thanks to Fanpop for letting me use this!
 
Here's what you need:
  • An oversize white shirt
  • A red dress
  • A white apron
  • White shorts
  • Ribbon in red (both thick and skinny) and yellow
  • White gloves
  • Gold or yellow and orange felt
  • White boots
How to assemble it:
  1. Get dressed, aside from the shirt. Cut out some of the thick red ribbon for the sleeves, shoulders and boots. Hand the shirt and the bits of ribbon to somebody or you can DIY (do it yourself).
  2. Once the sewing is done, put on the shirt, cut out long pieces of the skinny red ribbon and set them aside.
  3. Take one of those strips of skinny ribbon and put your hair in a ponytail.
  4. For the belt, wrap some of the orange felt around your waist and sew the ends together by hand. Same with the yellow felt on the gloves, but you'll have to cut it out before sewing them on.
  5. Make a bow out of the yellow ribbon and have somebody pin this for you. Wrap the boots with the last two strips of the thick red ribbon. Do the same with the skinny ribbon and the felt and you're done! ^^
Hope you enjoyed! ^^
 
Next lines: 7 Shots A-Slinging!

Monday, December 16, 2013

12 Cosplays of Christmas - 5 Bright Blazes (Flame Princess/Prince)


Day 5! ^^ When you think of winter and Christmas, what usually comes to mind? Warmth, of course! The fresh hot cookies, the steamy hot cocoa and, the ruler of winter warmth, a fire in the hearth... *sigh* =w=

Why would I bring this up? Because today's character is Flame Princess/Prince of 'Adventure Time!' ^^

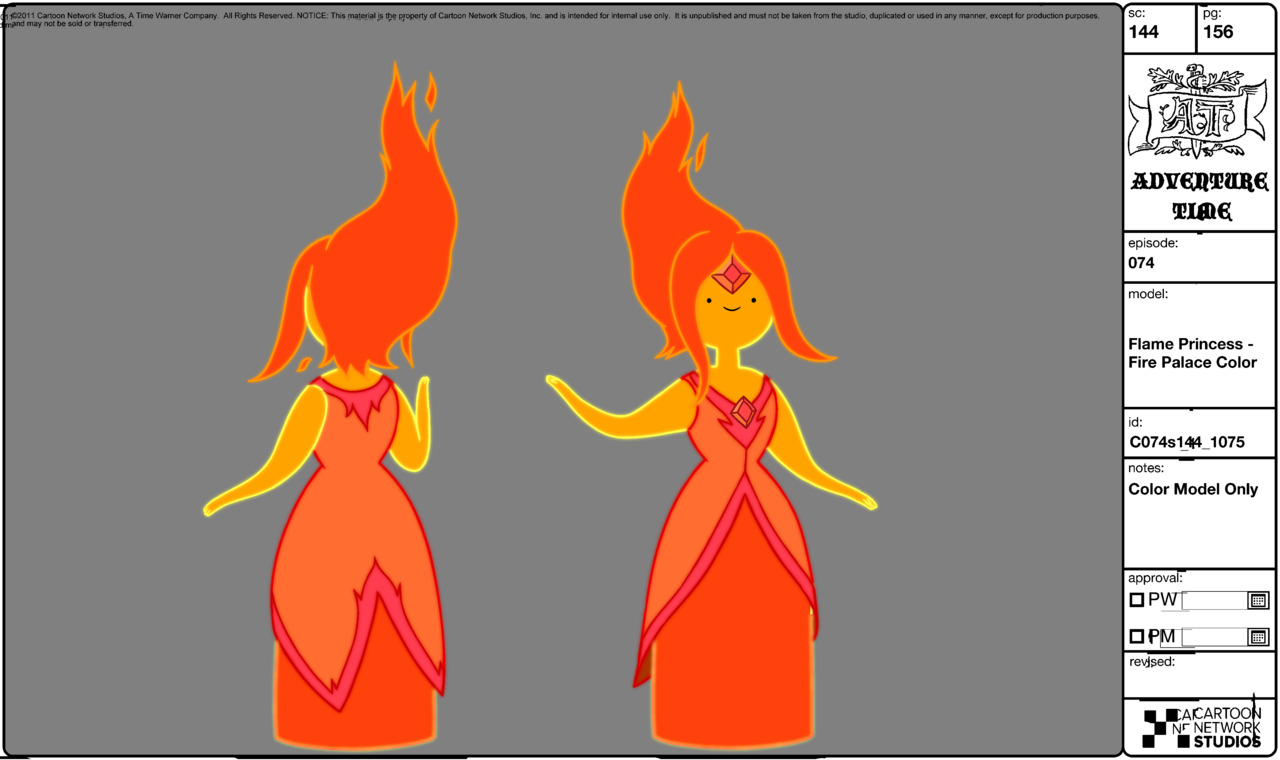
Here's a model sheet of Flame Princess! ^^ Many thanks to the Adventure Time Wiki for letting me use this!
 
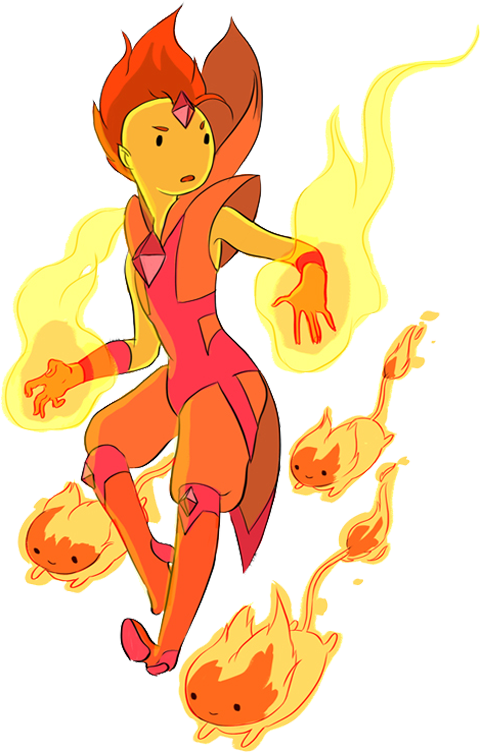
Here's a sketch of Flame Prince! ^^ Again, many thanks to the Adventure Time Wiki for letting me use this!
 
 
Here's what you need for both of them:
  • Red and orange hairspray
  • Orange and yellow face paint
  • An orange gown *Flame Princess*
  • An orange jumpsuit *Flame Prince* (make sure the legs are tuckable!)
  • Red ribbon *Flame Princess*
  • An orange sheet *both*
  • Red boots *Flame Prince*
  • Scissors
  • Sewing kit
Let's start with Flame Princess first. How to assemble her:
  1. Put on the dress.
  2. Take the orange sheet and have somebody draw where to cut it. Once it's finished, have him or her cut it out.
  3. Cut out some ribbon and somebody can pin it to the cut-out sheet and run through the sewing machine. Get everything on.
  4. Now for the makeup and hair! Grab a towel and drape it over your shoulders. Mix the orange and yellow paints together on a paper plate and have somebody paint it on your face and arms.
  5. For the hair, put it in a low ponytail and lift it upwards. Somebody can do the orange spray first and then tip it in red. Sculpt the ends of the tail to make the flames, make the gem out of red and you're done!
Now, for Flame Prince! (NOTE: The best way to sport this look is to wear the suit backwards so the zipper can be accessible. Also, you may need a Mohawk for this, too!)
  1. Put on the jumpsuit and cut out some red ribbon and fabric. Somebody can pin it and later sew it on. They can also cut off the sleeves.
  2. Once the suit is done, have somebody spray your hair orange and tip it in red and paint your face and arms.
  3. For the boots, use any scrap orange fabric and apply it to them. Make some gems and add them to your head and boots, make some wristbands out of red and you're done!
Hope you've enjoyed! ^^
 
Next line: 6 Ribbons A-Twirling!

Sunday, December 15, 2013

12 Cosplays of Christmas - 4 Singing Witches (DoReMi uniforms)

Day 4! ^^ Karoo, karra, karee! Today's costume is from 'Magical DoReMi!'

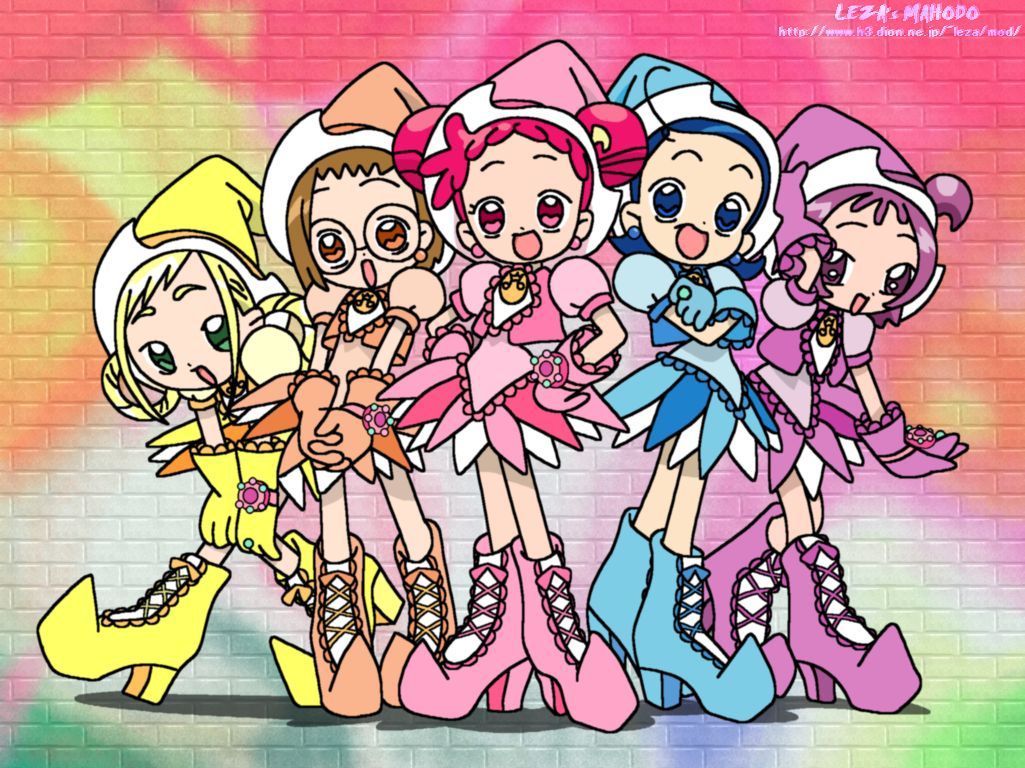
Here are the girls! ^^
 
 Here's what you need to assemble it:
  • A witch hat sewing design (can be ordered online outside of Halloween)
  • A dress of any color
  • White, darker and matching fabric
  • Ribbon of any color
  • Gloves of any color
  • Colored lace
  • Matching boots (cowboy and heeled ankle boots work better!)
How to assemble it:
  1. Have somebody make the hat out of white and whatever color fabric you want. Since this is a more individual uniform, you can use whatever colors or designs you want on it.
  2. Once the hat is done, begin cutting leaf or cat-eye shapes out of whatever fabric you have. If you're wondering, it's four matching, five white and two dark. Pin the shapes down on the skirt along with some corresponding colored lace.
  3. Cut a large diamond shape out of the white and repeat step 2.
  4. After running it through a sewing machine, onto the boots! Take some strips of white and glue them to the shoes. Do the same with bits of ribbon and finally topping it with a bow.
  5. Simply glue some lace onto the rim of the gloves and now you're done!
Next line: 5 Bright Blazes!

Saturday, December 14, 2013

12 Cosplays of Christmas - 3 Golden Bells (Dejiko)


Day 3! ^^ Today, time to bring out your scratching posts and plush mice because today's character is Dejiko from 'Di Gi Charat!'


Here she is! ^^
What you need:
  • A white beanie
  • White and pink felt
  • Large foam balls
  • Green, yellow and black craft paint
  • A plain white sock
  • Plush stuffing
  • A white apron
  • A blue dress
  • White faux fur
  • White furry legwarmers (if needed)
  • Blue ribbon
  • Newspaper
How to assemble it:
  1. Begin by gluing the white and pink felt together and cutting out large triangles. These will be the ears on the hat.
  2. Fold the ears into a cone shape, flip the beanie inside out and pin them down. Have somebody run it through a sewing machine and set aside.
  3. Lay down some newspaper on the ground or table. Take one of the foam balls, cut it in half and paint the halves green with a black line coming down the middle. They have to look like cat eyes!
  4. Take three more balls and paint them yellow with black. They need to look like bells! Let them dry for a bit with occasional turns to make sure the paper doesn't stick.
  5. Put some newspaper inside the beanie and glue on two of the bells and the eyes. Let the glue dry and remove the paper.
  6. For the gloves, trace your hand on the leathery side of the fur and cut it out. This may require two sheets, so do the same with the other side of your hand. Have someone sew them together threw a sewing machine.
  7. Now for the boots! If you have legwarmers, simply sew an additional piece of fur onto them so it'll go over your shoes. If not, just make some out of a few more sheets of it.
  8. For the tail, take the sock and fill it with the plush stuffing. Leave it until the costume is done.
  9. Now to get everything ready! After getting the dress and apron on, have somebody safety pin the tail onto the dress and tie a ribbon on it. Grab the gloves, boots and beanie.
  10. For the collar, simply take some ribbon, tie it around your neck (not to the point of strangulation!) and glue on the last bell. Wait until the glue dries and now you're done!
Next line: 4 Singing Witches!

Friday, December 13, 2013

12 Cosplays of Christmas - 2 Divine Sisters (Belldandy)

Day 2! ^^ Today, it's Belldandy of 'Oh! My Goddess.'

Here's a wallpaper of Belldandy and her sisters, Skuld (left) and Urd (right). ^^ Many thanks to New-Anime for letting me use this! 
 
What you may need for this:
  • A long flowy white dress
  • A blue satin robe (any type of skinny fabric will do)
  • Blue legwarmers
  • Matching blue gloves
  • Purple face paint
  • Yellow or gold felt
  • Any gold jewelry
  • Angel wings (optional)
  • Bobby pins
  • Hairspray
How to assemble it:
  1. Put on the dress and the robe, but leave out the sash. Cut off the sleeves on the robe.
  2. Cut out or make a long mountainous ribbon for the cuffs and the sides of the robe. Have someone pin them down for sewing.
  3. Once the sewing is done, have someone make the hair using the bobby pins and hairspray. After the hair is hard from the hairspray, let someone do the paint on your face.
  4. Put on the robe and any remaining pieces of clothing, slap on some gold jewelry and now you're done! ^^
Hope you enjoyed!
 
Next line: 3 Golden Bells!

Thursday, December 12, 2013

12 Cosplays of Christmas - A Giant Bottle of Vodka (Russia)

Ciao, folks! ^^ It's that other time of year again! It's Christmas and that means another year of '12 Cosplays of Christmas!' For those new to this, it's very similar to '13 Cosplays of Halloween,' but with one less costume and it works with any con in December. This year, I decided to move it from the 13th through Christmas Day to the 12th (today) all through Christmas Eve.

Let's head into the cold mountains of Russia because to start this sleigh ride, the character of the day is Ivan Braginski/Russia of 'Axis Powers Hetalia.'


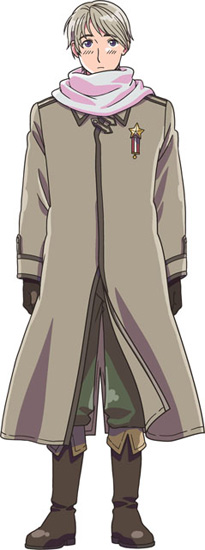
Here's Russia! ^^ Many thanks to the Hetalia Archives Wiki for letting me use this!
 
What you'll need for this:
  • A long tan coat
  • Tan felt
  • Brown ribbon
  • Black or brown gloves
  • Green pants (not too bright!)
  • Brown boots
  • A white or pink scarf
How to assemble it:
  1. Put on the coat and have somebody cover up the buttons with the ribbon (if any). Since the cover-up is temporary, have someone either put safety pins on it behind the coat. Same with the cuffs.
  2. Cut out some diamond shapes (think Rupees from Zelda) out of the felt, sew some ribbon onto the borders and safety pin them to the coat.
  3. Get yourself dressed, slap on the scarf and now you're done!
Next line: 2 Divine Sisters!

Thursday, October 31, 2013

13 Cosplays of Halloween - Juliet Starling (Lollipop Chainsaw)

This is it! The last recipe of this year's '13 Cosplays of Halloween!' Now, what comes to mind when you hear the word 'Halloween?' Well, there are jack-o-lanterns, costumes and the sound of kids yelling 'Trick or treat.' However, everybody would think of candy and the fake monsters that decorate the streets and yards. Why do I bring this up? Because to nail the coffin of this event closed for another year, I'm doing a recipe of Juliet Starling of 'Lollipop Chainsaw!'

Here's Juliet and Nick. ^^ I'm completely aware that there are more costumes, but this one's the most recognizable. Many thanks to an anonymous Deviant from deviantART for letting me use this!

Here's what you need:
  • A blue/purple sports bra
  • Matching blue ribbon
  • A matching blue/purple skirt
  • A brown belt
  • Pink scrunchies
  • Black and white wristbands
  • Thigh-high white socks
  • Red leg warmers
  • Tennis shoes
  • Printable fabric (That's a first!)
How to dress it:
  1. Put on everything, excluding the bra.
  2. Have somebody print out the 'San Romero Knights' logo on printable fabric. Let the ink dry, cut it out, and either sew it on or iron it on the bra.
  3. Tie two small strips of the blue ribbon to the straps.
  4. Put your hair up in pigtails and have somebody write 'San Romero Knights' down the outside of the socks. Grab a fake chainsaw and a lollipop and now you're done!
Just to let you all know, I'm gonna be gone November because I gotta plan for this year's 12 Cosplays of Christmas in December. Hope you've enjoyed this post and 13 Cosplays of Halloween 2013 and one more thing...

Have a Happy Halloween!! ^w^

Wednesday, October 30, 2013

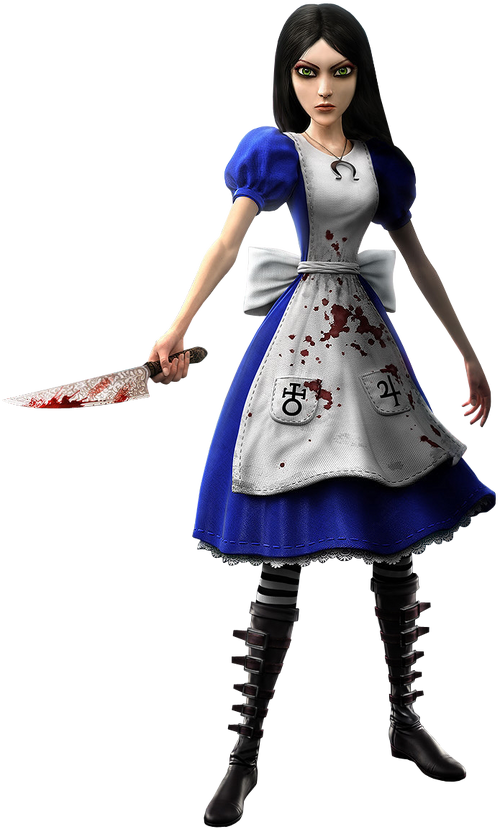
13 Cosplays of Halloween - Alice (American McGee's Alice)

Day 12! Only one more recipe in this event! Today is gonna be a 'wonder' because today, it's Alice from 'American McGee's Alice!'

Here's a picture of Alice! ^^ Quite dark, ain't it? Many thanks to the Alice Wiki for letting me use this!

What you need to became her:
  • A dark blue dress
  • A white apron
  • Black and white striped socks
  • Black boots
  • A fake knife
  • Fake blood
  • White ribbon
  • Oven-safe sculpting clay
  • Black ribbon
  • Silver paint
How to make it:
  1. Take some sculpting clay, make a horseshoe shape (sides included) and cook it in the oven. After it's cooled, start painting it in the silver paint and leaving it to dry.
  2. While waiting, get dressed and put on the apron. Have somebody splash some fake blood all over the apron, get a long strip of ribbon and tie it together with the strings of the apron.
  3. Check the clay. If the paint's dry, paint the bottoms of the shape and leave it to dry.
  4. After it's completely dry, tie the ribbon around the shape and tie it around your neck. You're now done!
Hope you enjoyed! ^^
Next character: You'll see tomorrow!

Tuesday, October 29, 2013

13 Cosplays of Halloween - Blanka (Street Fighter)

Day 11! 2 more recipes! Today, we'll be heading to Brazil because the character of the day is Blanka from 'Street Fighter!'

Here's a picture of Blanka!

Here's what you need for him:
  • Green face paint
  • Orange fake fur
  • Brown or yellowish shorts
  • Orange hairspray
  • Green gloves
  • A green long-sleeved shirt
  • Green shoes and long socks
How to assemble it:
  1. Get dressed in all green, except for the brown shorts. Grab a beach towel and have somebody spray your hair with the hairspray. For a better look, make your hair as wild as possible by brushing it backwards or ruffling it with your hands!
  2. Cut up some of the fake fur and either sew or glue the fur onto the shirt. These areas should be the lower arms, the chest and the back close to your hair. Fluff the fur by stroking it back.
  3. Put on the gloves, the shoes and socks and you're done!
Hope you enjoyed! ^^

Next character: Alice (American McGee's Alice)!

Monday, October 28, 2013

13 Cosplays of Halloween - Albert Wesker (Resident Evil)

Day 10! 3 more recipes! ^^ Today, it's gonna be another day in Raccoon City because we'll be looking at Albert Wesker from 'Resident Evil.'

Here's the 'Marvel vs. Capcom 3' design of Wesker. Many thanks to Comicvine for letting me use this!

Much like Frank West and the Redfield Siblings, this recipe's done 1-2-3. What you need:
  • A black shirt
  • Matching pants
  • Boots
  • A trenchcoat
  • Sunglasses
  • Hair gel
How to assemble it:
  1. Get dressed.
  2. Put a good glob of hair gel and sweep your hair back with it. It should look slicked back.
  3. Put on the sunglasses and you're done!
Hope you enjoyed! ^^

Next character: Blanka (Street Fighter)!

Sunday, October 27, 2013

13 Cosplays of Halloween: Couples' Crypt - Chris and Claire Redfield (Resident Evil)

Day 9! 4 more recipes! ^^ Today, we'll take one more trek into the Couples' Crypt and take a look at Chris and Claire Redfield from 'Resident Evil.'

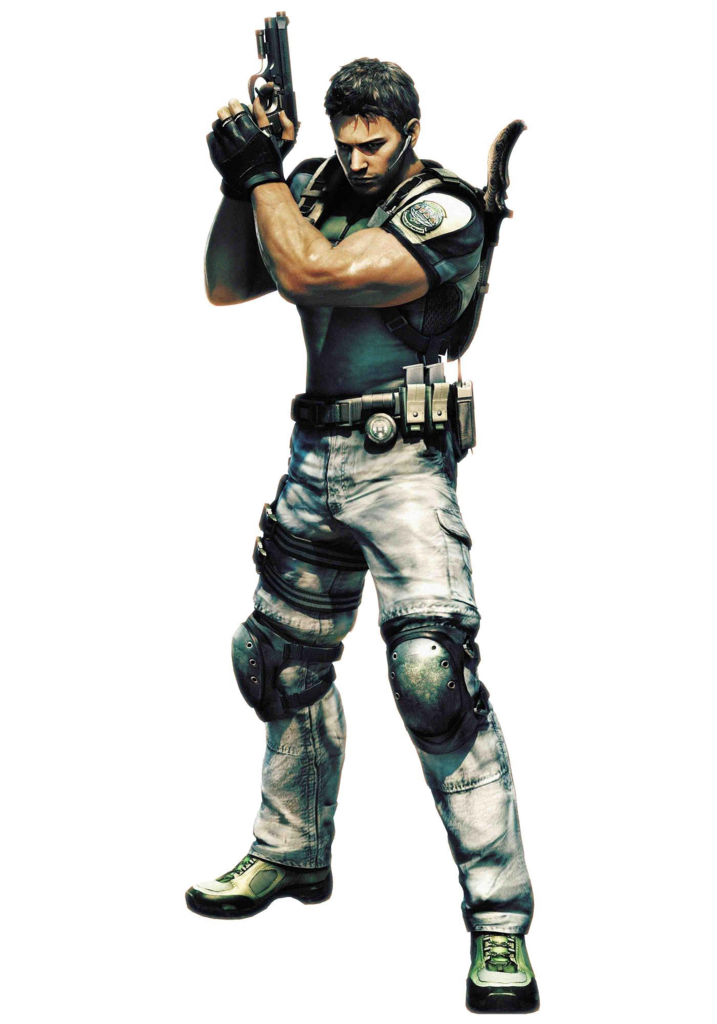
Here's a picture of Chris from 'Resident Evil 5.' ^^ If I got the wrong game, lemme know in the comment section!
Here's a picture of Claire from 'Resident Evil 2.' ^^ Many thanks to the Biohazard Wiki for letting me use this!

Much like Frank West, these are gonna be 1-2-3 recipes. First, let's start with Chris. What to use for this:
  • A gray and black shirt (UnderArmour, Danskin or any stretchy athletic clothing is highly recommended)
  • White or acid-wash pants
  • Tennis shoes
  • A heavy-duty belt
  • Knee pads
  • Fake knifes and guns
  • Knife pouches (can be sold online or found at Bass Pro Shop and any sporting goods store)
  • Black fingerless gloves
How to assemble it:
  1. Put the clothes, belt and knee pads on.
  2. Click the knife pouches onto the belt and remove anything inside.
  3. Grab the fake weapons, tie on your shoes and you're ready to go!
For Claire, here's what you need for her:
  • A short black leotard or a black shirt and matching shorts
  • A pink zip-up vest
  • Matching pink undies
  • Brown boots
  • Brown or black gloves
  • Scissors
  • Fake knifes
How to put it together:
  1. Get dressed. For the undies and vest, put them over the black clothes.
  2. Take the gloves, put them on and have somebody draw a large square on the top of your hand. Take them off, have somebody cut the square out and put them back on after.
  3. Put on the boots, grab a fake knife or a fake gun and you're done!
Hope you've enjoyed the Couples' Crypt! Now we'll resume our '13 Cosplays of Halloween' event. ^^

Next character: Albert Wesker (Resident Evil)!

Saturday, October 26, 2013

13 Cosplays of Halloween - Pyramid Head (Silent Hill)

Day 8! 5 more recipes left! ^^ Today, we'll have a look at Pyramid Head from 'Silent Hill.'

Here's a pic of Pyramid Head!
What to use for this:
  • Cardboard
  • Window screen mesh (found at most hardware stores, mainly Home Depot and Lowes)
  • Brown or bronze paint (DO NOT use spray paint! Only non-toxic paint!)
  • A brown or beige sheet
  • A fake machete
  • A bike helmet
  • Glue
How to assemble it:
  1. Begin by cutting up the cardboard into two long triangles and a standard triangle. Cut out the center of each for the mesh and add some glue onto the sides.
  2. Place the window mesh on top of the glue and let it dry. Afterwards, cut the surrounding screen and any remnants off. Glue the triangles together in order to make a long triangle. After the glue is dry, begin to paint the outside. TIP: Look for the window mesh that's the most breathable.
  3. After the paint is dry, glue the triangle to a bike helmet. While waiting for the glue to dry, wrap the sheet around your waist and secure it with a belt.
  4. Check the helmet and if the glue's dry, clip it on. Get a fake machete and you're done!
Hope you enjoyed! ^^
Next character: Chris and Claire Redfield (Resident Evil)!

Friday, October 25, 2013

13 Cosplays of Halloween - Simon Belmont (Castlevania)

Day 7! Today, we'll take a look at the vampire hunter Simon Belmont from the 'Castlevania' series.

Here's a promo image of Simon from 'Castlevania 2.' ^^ Many thanks to Pumpkinate of Listal for letting me use this!

What to use for this:
  • A blond wig
  • Black tights
  • A matching black shirt (use UnderArmor for best results)
  • Gray boots
  • Matching gray gloves
  • Cardboard
  • Duct tape in red and yellow
  • Aquarium gems (found in the aquarium section of any pet store or the pet section of any store)
  • Glue
How to assemble it:
  1. Like the Sir Daniel recipe, start by cutting up some cardboard for the armor. Cover up the makeshift armor with red duct tape, then make the designs using the yellow duct tape and gluing on the gems. I highly suggest using standard glue like Elmer's because hot glue will melt the plastic on the tape and ruin the costume.
  2. Put on the tights, shirt, boots and gloves. Have somebody secure the armor onto the clothes. Make sure that the armor can come off easy, so kneepads and elbow pads are highly recommended.
  3. Get your wig on, grab a whip (or a rope) and now you're ready to vanquish some vampires!
Hope you enjoyed! ^^

Next character: Pyramid Head (Silent Hill)!

Thursday, October 24, 2013

13 Cosplays of Halloween: Couples' Crypt - Sir Daniel Fortesque/Gargoyle (MediEvil)

Day 6! We have finally hit the halfway mark, everybody! ^w^ Let's celebrate it with another Couples' Crypt. For this one, let's head into the Hall of Heroes since it's Sir Daniel Fortesque and the Gargoyle from 'MediEvil!'

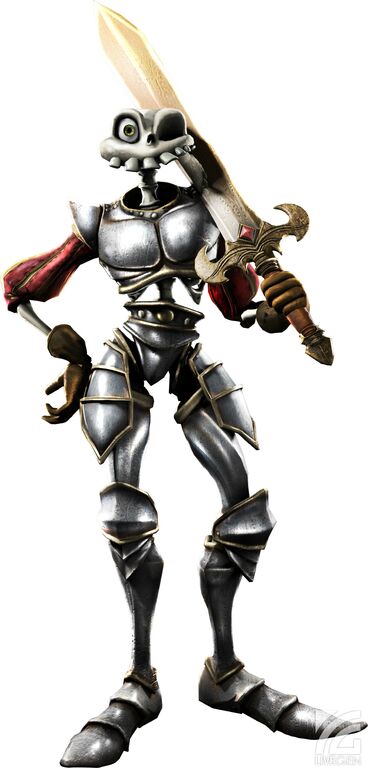
Here's Sir Daniel! ^^ This is the 'Playstation All-Stars' design, which we'll use as a model for the first recipe. Many thanks to the Fanon Wiki for letting me use this!

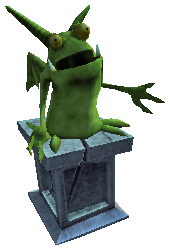
Here's the Gargoyle! This is the design from 'MediEvil: Resurrection.' Much like Sir Daniel, this will be used as a model for the second recipe. Many thanks to the Gallowmere Wiki for letting me use this!

First, let's start with Sir Daniel. Here's what you need:
  • A skull mask
  • Gray and colored duct tape
  • Cardboard boxes
  • A red long-sleeved shirt
  • A gray sleeveless shirt (not a tank top!)
  • Brown work gloves
  • Gray tights or leggings
  • A bag of fake eyes
  • Brown ribbon
  • Glue
  • Scissors
  • A green Sharpie or marker
Here's how to assemble him:
  1. Take the scissors and begin cutting the boxes up into different shapes. Cover them up with the duct tape. This will make up the armor.
  2. For Sir Daniel's head, take the skull mask and cut the bottom jaw off. Open the bag of fake eyes, take only one out, color around the pupil with the green marker and glue the eye onto the right socket. Afterwards, put it on a hook or hang it outside on a clothesline, so the glue can dry.
  3. Grab the red shirt and have somebody either sew or iron the ribbon. Hang it up so the shirt can cool if you ironed it.
  4. Put on the tights and safety pin some of the cardboard armor to them. If the shirt is ready, put it and the gray shirt on and safety pin the rest of the armor onto the gray shirt.
  5. Put on the gloves and the mask and you're done!
Now for the Gargoyle! For this one, I'm gonna take a Kigurumi pajama approach to this. Here's what you need to make it:
  • A large cardboard box
  • Gray duct tape
  • A plain green hoodie (kangaroo-style pocket)
  • Green, yellow, black and white felt
  • Scissors
  • Large Styrofoam balls
  • Green gloves
  • Suspenders
  • Rubber bands
  • Glue
How to assemble it:
  1. Put on the hoodie and gloves.
  2. Cut the top and bottom flaps of the box and snap on the suspenders. Take the cut-off flaps and cut them to fit around the suspenders; this will be part of the pedestal. Cover both of them with the duct tape.
  3. Cut the green and white felt into triangles. The green will be used for the wings and feet and the white will be used for the teeth. Do the same thing by cutting the black felt into circles, which will be used for the eyes later.
  4. Take the Styrofoam balls and wrap them with the yellow felt. Using rubber bands, tie the remains of the felt, cut most of it and sew the felt closed. Glue on the black circles you made earlier and safety pin them to the hood.
  5. For the wings and teeth, sew them onto the hoodie. Wings on the back of the coat and teeth on the bottom of the hood.
Now you're both done! ^^ Hope you enjoyed!

Next character: Simon Belmont (Castlevania)!

Wednesday, October 23, 2013

13 Cosplays of Halloween - Rick (Splatterhouse)

Day 5! Today is gonna be a messy one because it's Rick of 'Splatterhouse!'

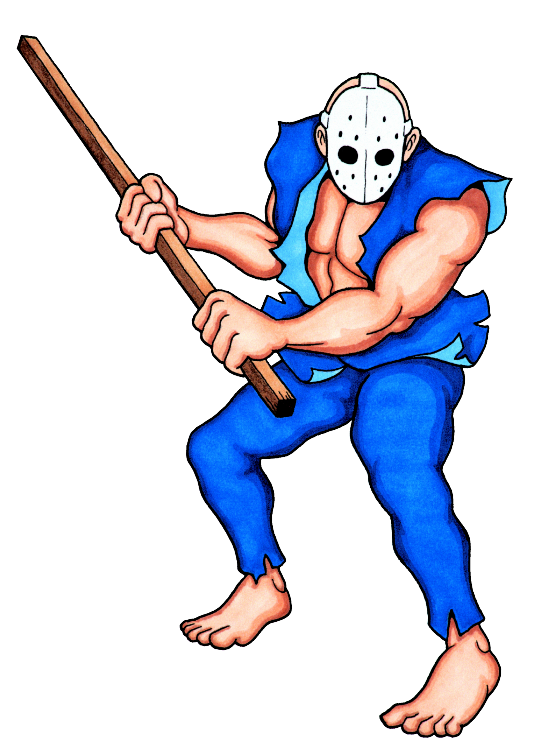
Here's the old design of Rick, which I'll use as a model for this recipe. Many thanks to the Splatterhouse Wiki for letting me use this!

Here's what you need:
  • A white button-up shirt (not long sleeved or Polo shirts)
  • White pants
  • A black belt (Karate or standard ribbon)
  • Blue clothing dye
  • A mask of Jason Voorhees
  • Scissors
How to assemble it:
  1. Take the shirt and scissors and cut off the sleeves and buttons. Just make sure you wouldn't be wearing it again later! Cut a small triangle from the pants to give them a worn-out look.
  2. Make the dye and put the clothes in it. Leave them alone and check them once in a while until you get the desired blueness. Hang the clothes up, so the dye can settle into them. Dispose any leftover dye NOTE: This step should only be attempted outside and by a clothesline! Dyeing things indoors will result in staining any and every kind of flooring.
  3. Once the clothes are dry and the dye's fully settled, put them on, tie a black ribbon or a black belt around your waist and put on the mask.
Now you're done and ready to defeat the evil monsters of West Mansion!

Hope you enjoyed and I do hope you find your Jennifer...

Next Character: Sir Daniel Fortesque/Gargoyle (MediEvil)!

Tuesday, October 22, 2013

13 Cosplays of Halloween - Frank West (Dead Rising)

Day 4! Today, let's grab our wallets and go on a shopping spree because the character of the day is Frank West of 'Dead Rising!'
Here's the MvC3 design of him. We'll be using this version as a model for this. Many thanks to the Marvel vs. Capcom Wiki for letting me use this!

What to use:
  • A white long-sleeved shirt
  • A black jacket
  • Gray pants
  • Brown shoes
  • A plastic bat
  • A camera
Since this one's pretty simple, there's little to no directions whatsoever on how to assemble it. This is also an excellent last-minute costume for a party! Not to sound like an infomercial, but this one is as easy as:
  1. Put the clothes and shoes on.
  2. Grab the bat and camera.
  3. Style the hair and you're done!
Hope you enjoyed! ^^

Next character: Rick (Splatterhouse)!

Monday, October 21, 2013

13 Cosplays of Halloween: Couples' Crypt - Ellie/Joel (The Last of Us)

Day 3! Another thing I'm gonna try on this year's CPoH is what I call 'Couples' Crypt.' Much like how I use the 'Uniforms of the Undead' on uniforms, I use 'Couples' Crypt' for costumes that can be used for couples or siblings. The characters I'll be using to start this off are Ellie and Joel from 'The Last of Us.'

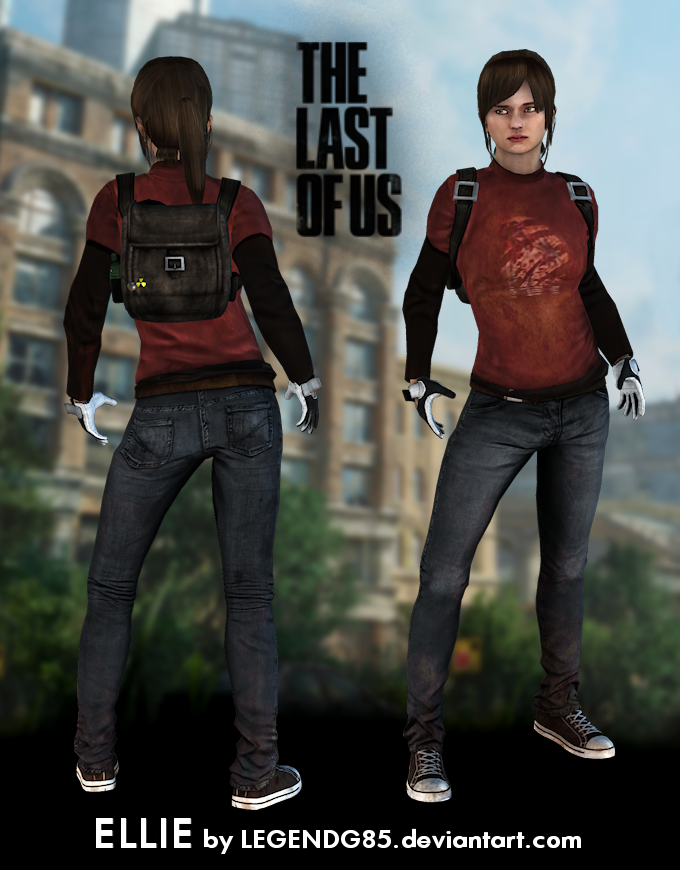
Here's a picture of Ellie I found on deviantART. Many thanks to legendg85 of DA for letting me use this!
Here's a picture of Joel. Many thanks to the Last of Us Wiki for letting me this!
What's needed for Joel:
  • A green plaid flannel shirt
  • Black jeans (Excellent since it's getting colder! ^^)
  • Black shoes or work boots
  • Fake machete and guns
And for Ellie:
  • A red or orange shirt
  • A brown long-sleeved shirt
  • Black or blue skinny jeans
  • Black and white shoes (hi-tops work better, but tennis shoes work too)
  • A small brown backpack
  • Black and white work gloves
How to make both costumes:
  1. Take some dirt and cover the clothes with it. Once you get your desired dirtiness, shake off any excess dirt and put them on. For Ellie, put on the brown shirt on first before the red shirt.
  2. Now for the add-ons! For Joel, strap on some fake guns and a fake machete. For Ellie, get your hair in a ponytail and throw on the backpack and gloves.
  3. For Joel's facial hair, you can do this by simply dabbing on some brown face paint with a sponge and then a brush. This will give the illusion of a real beard. You can also mix brown and gray paints to make the dirt patches on the hands and face.
  4. Throw on some shoes and now you're done!
Hope you enjoyed the first trip to the 'Couples' Crypt!'
Next character: Frank West (Dead Rising)!

Sunday, October 20, 2013

13 Cosplays of Halloween: Uniforms of the Undead - Little Sister (BioShock)

Day 2! Today, prepare to take a deep breath and dive into the deep (not really, so don't attempt!) because today, it's the Little Sisters of 'Bioshock.'

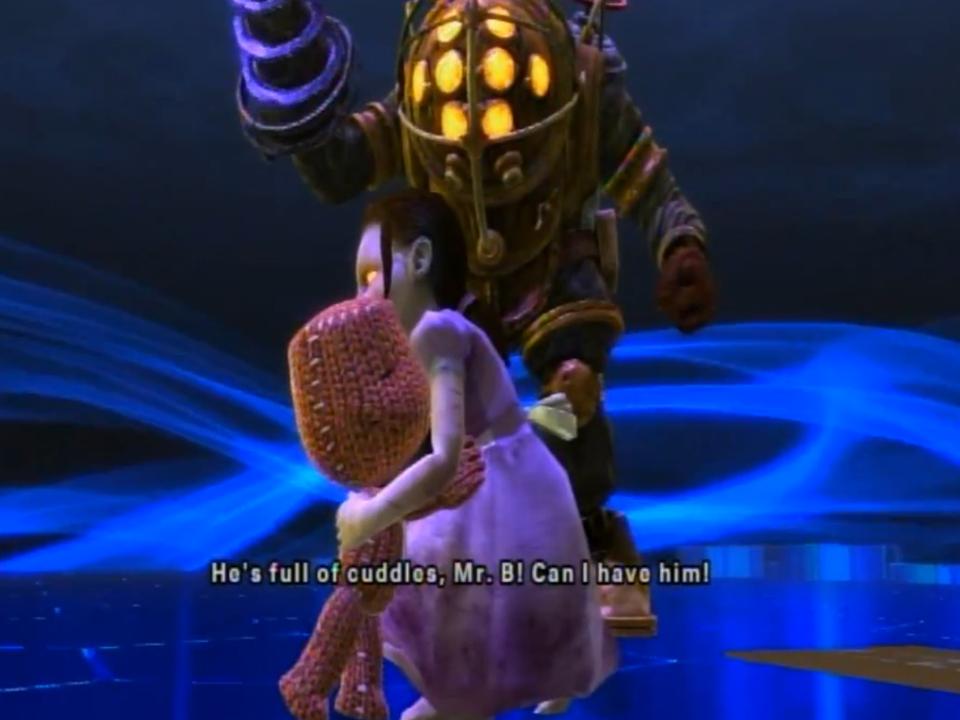
Here's a screenshot I took from one of CommunityGames' videos for 'Playstation All-Stars Battle Royale.' This is the Little Sister that will be the model for this.
Here's another screenshot from PSASBR. Ain't it cute? ^w^ Many thanks to the PS All-Stars Wiki for letting me use this!

What you need:
  • A lavender or pre-faded purple dress
  • White satin and matching ribbon
  • White felt or buttons
  • Scissors
  • Meat or fake blood
  • Tubes of face paint

How to make it:
  1. Put on the dress and have somebody pin the satin onto the chest area of it. Then, with the same help, tie the ribbon around your waist. Pin down four dots for the buttons.
  2. Begin sewing the satin and dots onto the dress, undo the ribbon and set the dress aside.
  3. Now let's make things dirty! Just like last year's Nurse costume, cover the dress in as much fake blood and dirt as possible. The idea here is to make the dress look like it's been stained with caked-in blood.
  4. Keep doing Step 3 until you get the desired filthiness. You can also do that with blood from a defrosted steak and mixing it in the dirt. Afterwards, shake off any excess.
  5. Once the blood on the dress is dried, put it back on, grab a towel and drape it over your shoulders and chest. Like last year's Marceline recipe, mix some black and white face paint on a paper plate until you get the right shade of gray. You can paint it onto your face and, if you even want to, your arms. Remember, it's better to use tubes than a palette because younger siblings need the palette too!
  6. Grab a purple scrunchie or rubber band, put your hair in a ponytail and you're done!
Hope you've enjoyed!

Next character: Ellie and Joel (The Last of Us)!

Friday, October 18, 2013

13 Cosplays of Halloween: Uniforms of the Undead - Ninjas (Mortal Kombat)

Hey, guys! It's that time of year again. No, not Christmas (for another 2 months). It's Halloween! ^^ That also means it's another round of '13 Cosplays of Halloween!' For those who are new to this, I post costume recipes that can be used for both October conventions and for trick-or-treaters that come to your door. I do this for from the 19th all the way until Halloween. ^^ I'll take you into the world of virus-powered zombies and demonic ninjas because I'll be using video games for this year's theme!

Let's christen this cruise of terror with going to Outworld because the characters of the day are the ninjas from 'Mortal Kombat!'

Here's a picture of Ermac. He'll be the model for the male costumes.

Here's Mileena. She'll be the model for the female costumes. Many thanks to the Mortal Kombat Wiki for letting me use these!
I'm completely aware that these are the older designs of Ermac and Mileena, but I prefer keeping things simple. Plus these could also double as last-minute costumes, so unless you have a pre-made Scorpion or Kitana costume, this will have to do. Anyway, here's what the men need for the top costume:
  • A black morphsuit (usually found at Party City or online)
  • Cardboard
  • Colored duct tape (red for Ermac, yellow for Scorpion, blue for Sub-Zero, original gray for Smoke, black for Noob, green for Reptile, etc.)
  • White fabric chalk, colored pencil or crayon
  • Elastic strap *glasses straps work too!*
For the ladies' costume:
  • Black sleeveless leotard
  • Thigh-high boots (usually found online)
  • Colored duct tape *red for Skarlet, purple for Mileena, blue for Kitana, green for Jade, etc.* (found at Home Depot, Lowes, Ace or online)
  • Scissors
  • Black shoelace or bootlace *8-hole (54 in./about 137 cm) preferable*
  • Black leather gloves
  • Elastic strip *same as men's*
Here's how to assemble the men's costume:
  1. Put on the morphsuit and have somebody draw a circle around where your face is. Take off the morphsuit, get some scissors, cut off the circle and the arms and put it back on.
  2. For the armor, take some cardboard and cut out some rectangles and other shapes. Take the duct tape and begin covering the cardboard with it. Take some black duct tape and tape the cardboard to your arms and legs. Begin to make the rest of the suit using both colored and black duct tape. Just don't forget to shave both your arms completely beforehand or it will hurt if you take it off!
  3. For the mask, take some cardboard, cover it in tape and punch out some holes on it so you can breathe. Then put it over your mouth and nose and secure it with a strap or tape.
Now the guys are done! Now for the ladies:
  1. Put on the black leotard and, just like the morphsuit, have somebody draw where to cut it and holes for the shoelaces. In this case, it's close to the breasts, so if you're modest, you might not like this. Take it off and have someone cut where they traced.
  2. After putting the leotard back on, begin feeding the shoelace through the holes made. Adjust it to the desired tightness and tie it.
  3. Now for the colors! Put on the boots and cover most of them with colored duct tape. If your boots are colored, use black duct tape to make rectangles on the sides of them. Line the gloves and cover the sides of the leotard with the same duct tape.
  4. For the mask, do the same as the men's. Make a mask out of cardboard, cover it in duct tape, cut out holes to breathe through and put it on with an elastic strap. Put your hair up in a bun and now you're done!
Hope you enjoyed! ^^

Next Character: Little Sister (BioShock)

Monday, September 2, 2013

Konata Izumi (Lucky Star)

Hey, guys! It's me! ^^ Ah, September... The hot temperatures rise up before turning into the soothing cool of autumn. It's last call for every pool and water park in the country. And people are showing off their bikinis and trunks one last time before packing it up for the winter... But this is also the beginning of the 'Back to School' season, when weathered bells ring and kids switch from couches to desks. So to close the summer and welcome the fall, here's a recipe for you otakus out there! ^^

Let's start it off with one little lady (even though she's a teenager), Konata Izumi from "Lucky Star!"

Here's Konata! ^^
Here's what you need:
  • A white long-sleeved shirt 
  • A pink dress
  • Pink and white ribbon
  • Brown socks
How to assemble it:
  1. Like I mentioned in the previous recipes, take the dress and some white ribbon and either sew or iron it on. This time, spread the strips of ribbon apart like in the picture.
  2. Here's the tricky part: Take some pink ribbon and cover the sleeves save for some white stripes. If you can't do that, use some white skinny ribbon for the stripes. Either sew them or iron them on.
  3. For the collar, take some pink fabric, tie it under your shirt and lay out some skinny white ribbon. Repeat last action on step 2. Take some brighter pink fabric and tie it outside of your shirt.
  4. Just put on socks and shoes and you're done! ^^
Now to plan on what to do for '13 Cosplays of Halloween...' Enjoy and have a great school year!

Sunday, July 14, 2013

Bastille Day 2013 - Francis Bonnefoy/France (Axis Powers Hetalia)

Here's the last Hetalia recipe for this month! ^^ And today, I'm catering to my friends in France.

Here's a chibi picture of Monsieur Bonnefoy since I don't have a regular picture at my disposal. ^^;

What to need for this:
  • A blue dress
  • A matching collared shirt
  • Red pants
  • Brown or black boots
  • White felt
  • Black gloves
  • A black belt
  • Scissors
  • A wavy blond wig
How to assemble it:
  1. Put on the dress, shirt, belt and pants. Have a parent or friend draw a curved triangle out of the front of the dress and cut it out. If it's big enough, use the scrap fabric to make the small cape on top of the shoulders. ("It's a cloak, no?" - France from the Funimation dub of APH)
  2. Afterwards, make the boots. You might need to look up the Finland recipe from way back in December for how to make them.
  3. Time for the wig~ When you get it nice and snug, make it look nice and pretty.
  4. Take an eye pencil and make a few lines to make the stubble, put on the gloves, grab a fake rose and now you're done!
Hope these recipes can tide you all over until a recipe I'll be posting for Tanabata. ^^ Hope you enjoy and...

Avoir une grande Fête Nationale!!! @};-
(Hope you have a great Bastille Day!!!)

Thursday, July 4, 2013

Independence Day 2013 - Alfred F. Jones/America (Axis Powers Hetalia)

Here's part 2 of my Hetalia recipes for July! Since I made one for Canada, I'd figure I make one for my home here in the States too. ^^

Here's a picture of America from the show! ^^ Many thanks to CosplayIsland UK for letting me use this!
 
Here's what you need for this:
  • A white collared shirt
  • A greenish or brownish tie
  • A tan blazer
  • Tan pants
  • A black belt
  • A brown jacket
  • Brown wool or faux fur
  • Black gloves
  • Black shoes
  • A short gold wig
How to assemble it:
  1. Put on the shirt, tie, jacket, pants and shoes. Have a parent or friend pin some wool or faux fur around the collar of the jacket and sew it by hand or take off the jacket and have them machine sew it. Take off the coat and set it aside.
  2. For the top part of the uniform, put on the blazer and belt. Have a parent or friend draw on some pockets with a fabric marker.
  3. For the wig, part it and grab a small chunk. The chuck of hair will be the Nantucket. Apply some hairspray on both. Grab some sunglass frames and you're ready to gobble down those burgers and guzzle those shakes! ^^
Next country will be France! ^^ Hope you enjoyed and...
Have an awesome Independence Day!! [|:3>

Monday, July 1, 2013

Canada Day 2013 - Matthew Willams/Canada (Axis Powers Hetalia)

Hey, folks! ^^ It's me, Bri! Sorry for the HUGE disappearance over June. I needed to think of what recipes to do for this month and my router crashed. So I'll be posting a few Hetalia recipes to tide you all over until August and to say 'gomenasai' ('sorry' in Japanese) for vanishing.

First up is a recipe for my friends up north in, well, Canada!

Here's a chibi picture of Canada! ^^ Sadly, I couldn't find a regular picture of him... Many thanks to Zerochan and fir3h34rt of deviantArt for letting me use this!

Here's what I'll be using for the uniform! ^^ Many thanks to Cosplay Fantasy for letting me use this!

Here's what you need for this:
  • A tan coat and vest
  • Brown or black ribbon
  • Black or dark green pants
  • Black boots
  • White faux fur (Optional)
  • A short wavy blonde wig
  • A yellow headband
  • Yellow pipe cleaners (found at Michael's, Jo-Ann Fabrics, Walmart or any craft store)
  • Fake glasses (found at Party City or online)
How to assemble it:
  1. If the hood on your coat doesn't have fur, have a friend or parent take some faux white fur. Then, have them sew it by hand or run it through a sewing machine.
  2. Put on the coat. If your coat doesn't have multiple pockets, put on a matching vest.
  3. Put on the pants and boots. Be sure to tuck the legs into the boots before lacing or zipping the boots up.
  4. For the wig, put on a short wavy blonde one and readjust it until it's snug and comfy.
  5. For Canada's ahoge ('antenna hair'), curl part of a pipe cleaner, either glue or stick it onto a headband and put it on top of your wig. If you used glue, wait until it's dry before put it on.
  6. Put on some fake glasses and grab a white bear plush (regular or polar) for Kumajiro and you're done!
Next country will be America! Hope you enjoyed and...

Have a great Canada Day, eh? *..*

Monday, May 6, 2013

Golden Week 2013 - Miss Goldenweek (One Piece)

Okay, this one's for my friends over there in the land of the rising sun. Today, to honor the closing of Golden Week 2013, today's character recipe is Miss Goldenweek of 'One Piece!'

I know what my friends here in the states are thinking. 'What exactly is Golden Week?' To sum it up, it's very similar to Spring Break or, for my UK friends, Half Term. However, it's a series of holidays that last throughout the week, rather than just having a break from school like here in the States.

Here's a picture of her. ^^ Ain't she cute? Many thanks to sturmsoldat1 of deviantART for letting me use this!
Here's what you need:
  • A pink sunhat or bucket hat
  • Lime green ribbon
  • A light blue short-sleeved shirt (Optional if it has clouds on it already)
  • A black tank top
  • A brown or reddish-brown skirt
  • Blue-striped knee-high socks
  • Pink and white shoes (Highly recommending high-tops or Converses)
  • Sheets of white and gold or yellow felt
Here's how to make everything:
  1. First, let's focus on the shirt. That is, if it doesn't have pre-printed clouds on it. Make some some clouds out of the white felt and have a parent or friend iron it or sew it on. Set it aside for after you get the rest of the costume finished.
  2. Take some of the yellow felt and, using a fabric marker, make letters that spell out 'GOLDEN.' Similar to the clouds of the shirt for the jacket, have a parent or friend iron or sew the letters onto the top. If you want, line the collar of the top with the same yellow felt.
  3. Get some white fabric or felt and make four blocky bottle shapes. Put on the skirt and have a parent or friend align the shapes bottom-first with the top hem. Have them sew the shapes on afterward. If the skirt has belt loops, move the shapes under them so you can still be able to wear a belt.
  4. For the hat, just grab some lime-green ribbon and tie it to a pink sunhat or bucket hat. Just make sure you're still able to wear it. Wouldn't wanna pass out at a con or lose it.
  5. For the hair, do a pair of pigtails and, using either yellow or orange hairties, make some Jasmine-like tails.
  6. Add in some blush on your cheeks, a yellow bead or pearl necklace, a green pendant, a green bracelet and a gray wristband and you're done!
Now you're ready to control others with paint (not really... ^^; )! To my friends in Japan,
Hope you had a happy Golden Week!

And to my friends here in America, Happy Cinco de Mayo!!

Monday, April 22, 2013

Gomenasai!

Hey, guys. It's Bri. Sorry for not posting any new recipes, but I had so much going on recently. I've gotten into job hunting, I'm planning a trip for my 22nd birthday and my Netbook isn't working right now. Here are some recipes I'm hoping to make later on:
  • Miss Golden Week (One Piece) - May 5th (Cinco de Mayo *US*/Childrens' Day *JP*)
  • France, Canada and America (Axis Powers Hetalia) - July 1st, 4th and 14th
  • Ghost-themed character recipes - August 14th-15th (Bon Festival)
  • A star-themed character recipe - August 13th (Tanabata)
  • School uniform recipes *with a couple of updated throwback posts!* - August-September (Back to School)
Those will be some of the future recipes I'll work on once I get my things straight. Again, sorry for the lack of posts; I just have a lot on my bento box...

See y'all in May! ^^

Sunday, March 31, 2013

Easter 2013 - Momiji (Fruits Basket)

Hey, folks! Bri here. ^^ What do most people think of when they hear the word 'Easter?' Some would mention either the dyeing of eggs, the cute little ducklings romping about in their yard or those sugar-coated marshmallow chicks that sometimes makes their teeth hurt. But the one answer that everybody thinks of when they hear 'Easter' is bunnies~ So to celebrate the holiday, I picked an adorable rabbit of the anime world, Momiji of 'Fruits Basket!'

Here's a picture of him. Isn't he cute? ^w^

Here's his rabbit form on top of Tohru's head. ^^ Many thanks to Glogster for letting me use this!
 
Here's what you need for this:
  • A dark blue beret
  • A matching dark blue long-sleeve shirt
  • A white long sleeve button-up shirt
  • A Cami Secret in white (usually found in the 'As Seen On TV' section at Rite Aid, Walmart, Walgreen's, etc.)
  • Dark blue shorts
  • White socks
  • Boots in orange or black
  • Skinny blue ribbon
  • Regular white ribbon
How to make it:
  1. Take the white shirt, put it on and make sure to leave the shirt partly open, about 3 or 4 buttons off. Have a parent or friend cut the buttons and pin some of the skinny ribbon on the cuffs and around the collar. They can then sew it on. If you're crossplaying (in this case, a girl dressing as Momiji), put on the Cami Secret on your bra and have a friend or parent do the same thing.
  2. For the hat, simply line the beret with the white ribbon and sew it on. Make sure it'll still fit your head!
  3. Put on the jacket, line the bottom of it with the white ribbon and sew it on.
  4. Now put on the shorts, the socks and the boots.
And you're done! ^^ Just bring a white rabbit with you or take some fake rabbit ears and add some black felt for the tips.

Hope you enjoyed and...
Happy Easter!
(\_/)
(o.o)
(___)0