Thursday, December 25, 2014

12 Cosplays of Christmas 2014 - 12 Pumpkins A-Glowing (Jack Skellington *Nightmare Before Christmas*)

Day 12! ^^ This is it, folks! The final recipe of this year's 12 Cosplays of Christmas and of 2014! Let's take one last trek into Halloween Town because to close 2014 and ring in 2015, it's Jack Skellington also from "Nightmare Before Christmas!"

 
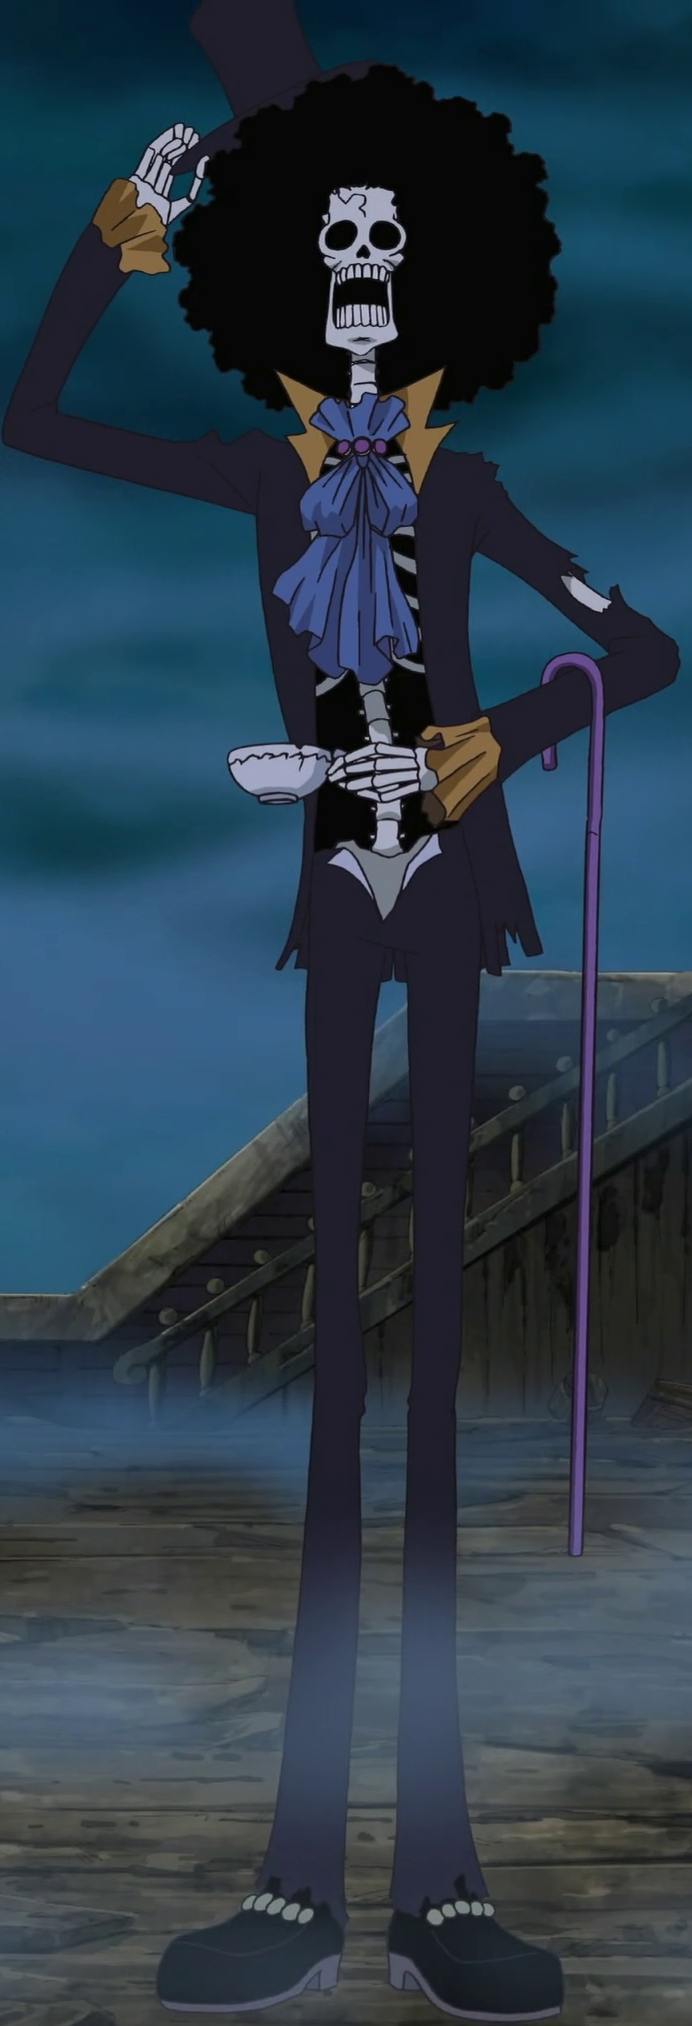
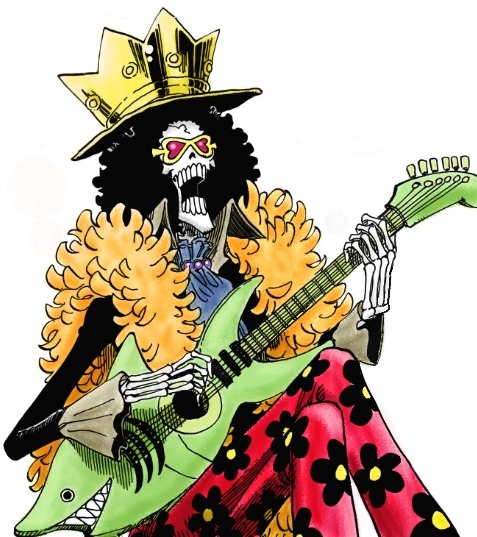
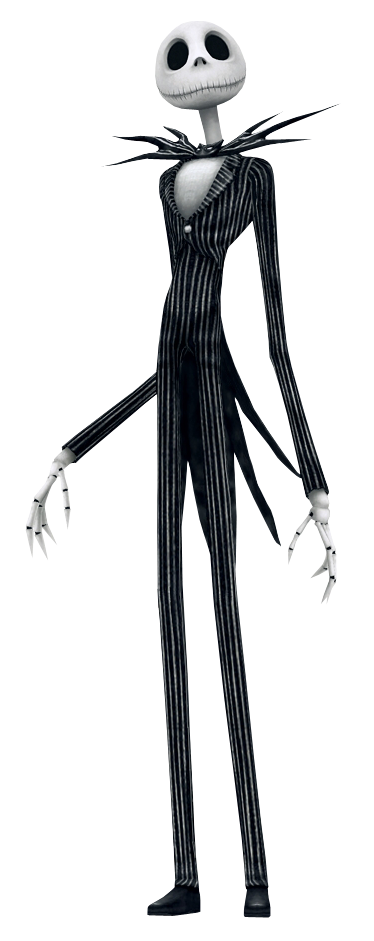
Much like Sally, this is his Kingdom Hearts design! ^^ Many thanks to the Kingdom Hearts Wiki for letting me use this!
 
Here's what you need to assemble him:
  • A bald cap
  • Liquid Skin (currently found online)
  • Black and white face paint
  • An old black and white suit
  • Skeleton gloves
  • Black shoes
  • Skinny white ribbon
  • Black and white felt
  • A black bowtie
How to assemble him:
  1. Put on the suit and have somebody roll out, cut and sew on the ribbon. The strips will be the stripes on Jack's suit.
  2. After the ribbon is pinned, give it to your helper so they can sew them on.
  3. Time to get bald! Put on the bald cap and seal it up with the Liquid Skin.
  4. After the latex is dry, take some of the white paint, paint your entire face (and maybe neck, Whatevs! ^^) white and let it dry.
  5. After the paint is dry, paint the hollows and lids of your eyes and some stripes along your cheeks and lips black. Add a curvy line across the stripes for the teeth.
  6. Put on the gloves.
  7. Have somebody cut up the felt for the tie, glue it on and leave it to dry. Clip it on and now you're done!
Hope you've enjoyed both this recipe and 12 Cosplays of Christmas 2014! ^^ Now, as I usually do, I will take a month-long break to plan out my Valentine's Day posts. So as I annually would say it...
 
Have a Merry Christmas 201and a Happy New Year 2015!!! *<^(w)^ .o*

Wednesday, December 24, 2014

12 Cosplays of Christmas - 11 Leaves A-Blowing (Sally *Nightmare Before Christmas*)

Day 11! ^^ One more recipe! Let's bring out our needles and whatever thread we have because today, it's Sally from "Nightmare Before Christmas!"

Here's her design from Kingdom Hearts! ^^ Many thanks to the Nightmare Before Christmas Wiki for letting me use this!


Here's what you need to assemble her:
  • A Sally dress (can be bought at Hot Topic, but you can have a friend make it too!)
  • Black, blue and white face paint
  • Striped socks
  • Black heels (Not too tall if you have balance issues!)
  • Blue tights
  • Blue gloves
  • A black fabric marker
  • Red lipstick
  • A red straight wig or red hairspray (Optional if you're a redhead.)
  • Mascara or fake lashes
How to assemble her:
  1. Get dressed, including the tights and gloves. Have somebody draw some stitches on them.
  2. Put on a towel, drape it over your shoulders and spray your hair red. If you have the wig, put it on.
  3. Mix some of the blue and white face paint until you get the desired shade of blue. Paint your whole face (and maybe your neck) and let it dry.
  4. Take some of the black face paint and have somebody paint some stitches onto your face and neck.
  5. Put on some lipstick and some fake lashes (or mascara) and now you're done!
Hope you enjoyed! ^^
Next line: 12 Pumpkins A-Glowing!

Tuesday, December 23, 2014

12 Cosplays of Christmas 2014 - 10 Bats A-Cracking (Scout *Team Fortress 2*)

Day 10! ^^ Let's head out to the ball park because today, it's the Scout from "Team Fortress 2!"

Here he is with his bat! ^^ Many thanks to the Team Fortress Wiki for letting me use this!
 
Here's what you need to assemble him:
  • A black baseball hat
  • A red or blue shirt
  • Black or gray
  • White socks or tights
  • Cleats
  • Dog tags
  • A roll of white bandages
  • A black belt
  • A gaming headset
This one's very, very simple, but I'll type it out anyway. ^^ Here's how to assemble him:
  1. Get dressed.
  2. Put on the hat, headset and dog tags.
  3. Wrap your hands with the bandages. Be sure you can still make a fist.
  4. Grab a bat and now you're ready!
Hope you enjoyed! ^^
Next line: 11 Leaves A-Blowing!

Monday, December 22, 2014

12 Cosplays of Christmas 2014 - 9 Sabers A-Swiping (Strider Hiryu *Strider/Vs. Capcom series*)

Day 9! ^^ Three more recipes left! Today is a little choppy and dicey because it's Strider Hiryu from, well... "Strider" and the "vs. Capcom" series!

Here's his Ultimate Marvel vs. Capcom 3 design! ^^ Many thanks to the Marvel vs. Capcom Wiki for letting me use this!
 
Here's an alternate design of him! ^^ Many thanks to the Capcom Database Wiki for letting me use this!
 
A closeup for his kanji. ^^ Again, many thanks to the Capcom Database Wiki for letting me use this!
 
If you have asthma or tend to have shortness of breath, this is NOT for you! Anyway, here's what you need to assemble him:
  • An old gi (karate outfit)
  • Purple or blue clothing dye
  • A long, wide red scarf
  • Red fabric paint
  • A roll of bandages
  • Purple or blue boots
  • A white belt
  • Duct tape in silver
  • Scissors
  • Red ribbon
How to assemble him:
  1. Make the dye and dip the gi in it. Leave it in the dye and take it out if you get the desired shade on it. Hang it up to dry once you're done.
  2. After the gi is completely dry, have somebody paint the kanji on it and leave it to dry more.
  3. Put on the boots and the gi and have somebody cut the sleeves off. Wrap the scarf around your mouth and nose, but loosely so you can bring it down.
  4. Wrap the red ribbon around your waist, cut the desired length and tie the ends closed.
  5. Now for the bandages! Wrap the bandages around your wrists and where the pants of your gi and the boots meet.
  6. Wrap the white belt with duct tape, punch out the belt holes using the scissors (Be careful!), put it on and now you're done!
Hope you enjoyed! ^^
Next line: 10 Bats A-Cracking!

Sunday, December 21, 2014

12 Cosplays of Christmas 2014 - 8 Blizzards A-Howling (Storm *X-Men/Marvel vs. Capcom series*)

Day 8! ^^ Four more recipes left! Let's grab our parkas and mittens because today it's Storm from both the X-Men comics and the "Marvel vs. Capcom" series! ^^

Here's a pic of her! ^^ Many thanks to the Marvel vs. Capcom Wiki for letting me use this!
 
Here's what you need to assemble her:
  • A black strapless one-piece swimsuit
  • An old black flat sheet
  • Black thigh-high socks
  • Matching black boots
  • Gold or yellow ribbon
  • Gold bracelets or yellow wristbands
  • White hairspray
  • A black headband
  • Black pipe cleaners
Here's how to assemble her:
  1. Put on the swimsuit and socks.
  2. Tie the flat sheet loosely around your wrists and slip on the wristbands.
  3. Have somebody measure how much ribbon will be need for the costume. They can also sew the ribbon on. These will be used for the socks and the top of the swimsuit and cape.
  4. Afterwards, grab a towel, drape it over your shoulders and have somebody spray your hair. Comb your hair to distribute it evenly and let it dry.
  5. After the spray's dry, make the headdress by cutting and shaping the pipe cleaners and sticking them into the headband.
And now you're done! ^^ Hope you enjoyed!
Next line: 9 Sabers A-Swiping!

Saturday, December 20, 2014

12 Cosplays of Christmas 2014 - 7 Servbots A-Serving (Tron Bonne *Megaman*)

Day 7! ^^ We hit the week mark, folks! Today's a bit greasy and squeaky because it's Tron Bonne from the "Megaman" series!

Here she is with some of her Servbots! ^^ Many thanks to the Capcom Wiki for letting me use this!
 
Here's what you need to assemble her:
  • A Styrofoam ball
  • A short, black, button-up shirt
  • A long pink shirt
  • Brown or black feetie tights
  • Pink shoes
  • Short pink gloves
  • Duct tape in silver
  • Large ball earrings
  • A black ultra fine-point marker (Sharpie or any brand) or black craft paint
  • A medium brown wig
  • A pink headband
  • Hair gel
  • Old white socks
  • Athletic cup
  • Fabric tape or glue
How to assemble her:
  1. Cut a Styrofoam ball in half and draw a pseudo-smiley face on it like in the picture. Take the earrings and draw the same face on them.
  2. Get dressed.
  3. Time to get taped! Cut up some strips, apply them onto the cup and draw some bolts on it. Place it over your crotch and tape it down. Not too much, though. You still need to walk and move around so do a walk test to see if you can still move.
  4. Cut the socks and roll them onto your wrists and ankles.
  5. For the hair, take some gel and sculpt your natural hair with it. You can do this with a brown wig too. After the gel dries, slip on the headband.
  6. Take some fabric tape or fabric glue and glue the pseudo-smiley face onto your shirt.
  7. Slip on the gloves, earrings, shoes and jacket and now you're done!
Hope you enjoyed! ^^
Next line: 8 Blizzards A-Howling!

Friday, December 19, 2014

12 Cosplays of Christmas 2014 - 6 Stars A-Shining (Rosalina *Super Mario Galaxy*)

Day 6! ^^ Today, let's blast off into space because it's Rosalina from 'Super Mario Galaxy!'

Here's a pic of her! ^^
What you need to assemble her:
  • An aqua dress with long sleeves
  • A silver crown
  • A light blonde wig (Optional if you already have this hue of blonde hair!)
  • Hair gel
  • Silver shoes
How to assemble her:
  1. Get dressed.
  2. Put on the wig and using the gel, sculpt it to something close to the pic above.
  3. Put on the crown, maybe grab a star plush for Luma and now you're done!
Hope you enjoyed! ^^
Next line: 7 Servbots A-Serving!

Thursday, December 18, 2014

12 Cosplays of Christmas 2014 - 5 Black Egrets (Parasoul *Skullgirls*)


Day 5! ^^ Ten hut, fellow soldiers! Prepare yourselves for today's mission because it's Parasoul from 'Skullgirls!'

Here's a pic of her! ^^
 
Another pic of her! ^^ Many thanks to the Skullgirls Wiki for letting me use these!
 
Before I can go on, I have a bit of a disclaimer for my more religious fans. I did some research and the inverted cross on Parasoul is NOT a Satanic cross. It's actually the cross of St. Peter, so calm down before you post anything negative on this post.
 
Now that I have that outta the way, back to the recipe! Here's what you need for her:
  • A black turtleneck shirt
  • A matching black skirt
  • Black flats
  • Duct tape in regular gray and gold
  • A black pointed umbrella
  • Red hairspray or a long red wig (Optional if you're already a redhead.)
How to assemble her:
  1. Get dressed.
  2. Take some of the gray duct tape and make a St. Peter cross on the chest.
  3. Cut up some cat eye shapes from the gold duct tape and place it onto the umbrella. This'll work better if it's open (preferably outside if you're superstitious) and you have somebody to help with the application.
  4. Now for the hair! Either spray your hair, comb to distribute it evenly and let it dry or set up a wig.
Now you're done! ^^ Hope you enjoyed!
Next line: 6 Stars A-Shining!

Wednesday, December 17, 2014

12 Cosplays of Christmas - 4--HEY! Listen! (Link *Legend of Zelda*)

Day 4! ^^ Our first recipe after my 100th post! Today, let's venture into Hyrule because the character of the day is Link from "Legend of Zelda!"

Here's a pic of his "Twilight Princess" design! ^^ Correct me if I'm wrong in the comments. Many thanks to Cosplay Deal for letting me use this!
 
Here's what you need to assemble him:
  • A white jumpsuit
  • Green and brown tunics
  • Brown gloves
  • Brown boots
  • A green nightcap
  • A blonde wig
  • A fake sword
  • A brown belt
This one's gonna be super, super simple, but here's how to assemble him anyway:
  1. Get dressed.
  2. Either spray your hair yellow or grab a short blond wig. Style afterwards.
  3. Strap the sword and now you're done!

Hope you enjoyed and I hope you find your Zelda... <3
Next line: 5 Black Egrets!


Tuesday, December 16, 2014

100th POST!!! - Gold Lightan (Gold Lightan)


Well, here it is, folks... My 100th post!!! Thank you all for letting me go this far. ^^ Anyway, let's celebrate this centennial recipe with something fitting... Gold Lightan from, well, "Gold Lightan!"

Now, what's "Gold Lightan," you may ask? Well, it's an anime made by Tatsunoko about a kid who gets a lighter that transforms into a giant robot. Over time, he comes across other objects, from a toolbox to a coin case to even a pencil sharpener, that--surprise, surprise-- also turn into giant robots.
Gee, a show about stuff that can transform into a bunch of giant robots? Where have I heard that before, you may ask again? And the answer is yes. It's similar to Transformers (or "GoBots" by their Japanese name, correct me if I'm wrong.), but with other objects instead of trucks and cars.

Here's a picture of him! ^^ Many thanks to the Tatsunoko vs. Capcom Wiki for letting me use this!
 
What you need to assemble him:
  • Cardboard boxes in different sizes
  • Gold and green craft paint
  • A paint roller
  • Duct tape
  • Black China marker
  • Gold pants
  • Gold and red face paint
  • A gold shirt
  • Gold gloves
  • A box cutter or carpet cutter
How to assemble him:
  1. Get dressed.
  2. Grab and cut some of the small boxes. These can be the shoulder armor, the hat, the overlay for the gloves and the shoes.
  3. For the body, cut the ends of a large box and slip inside it. Have somebody mark where to cut on two of the box's sides and cut the holes so your arms can come out.
  4. You can do a "walk test" to see if you can still walk with the box. If it's too big, you can cut and resize it until you find the perfect size. Also, cut down the side of the box so you can take off the box for either bathroom breaks or just a break from the being-a-cardboard-robot sweats. 
  5. Cut up some of the scraps to make the shin armor and front rim of the hat. Somebody can glue on the rim. Leave it to dry.
  6. Time to paint! Have somebody pour some of the gold craft paint into a tray and roll some onto a paint roller. Paint the boxes (save for the hat) and leave them to dry.
  7. Time for face paint! Paint your face (save for the eyes) with the gold face paint. Repeat it with the red paint around the eyes and on the lids.
  8. Check if the craft paint's dry. If it is, time to put them on!
  9. Have somebody paint a green diamond on the cap and once it's dry, you're done!
Tomorrow, we'll be return to "12 Cosplays of Christmas." Hope you enjoyed and again, thank you for the views and the support! ^^
Next line: 4 Shiny Rupees!

12 Cosplays of Christmas 2014 - 3 Glittering Diamonds (Rarity *Equestria Girls*)

Day 3! ^^ Today is gonna be special because I will be posting two recipes instead of one in celebration of my 100th post. ^^ Anyway, let's canter in our coats towards the fresh powder because our first recipe of today is Rarity from "Equestria Girls!"

Here's a pic of her! ^^ Many thanks to MLP-Mayhem of DeviantART for letting me use this!
 
What you need to assemble her:
  • Purple or blue hairspray
  • White face paint
  • Matching white gloves
  • Sky or baby blue eyeshadow
  • A white medium sleeve top
  • A fancy belt
  • A purple skirt
  • Gold cuff bracelets
  • Blue and purple sparkly fabric (felt, satin, etc.)
  • Purple boots
  • A blue rhinestone barrette
How to assemble her:
  1. Start by spraying your hair with the hairspray. While letting it dry, comb it in to distribute it evenly.
  2. Paint your face white and apply the eyeshadow on your upper lids. The face paint is optional if you have either a dark skin tone or a pale skin complexion.
  3. After the makeup is dry, get dressed.
  4. Take some of the purple fabric and tuck it into your boots. Leave some draped over the opening of the boots.
  5. Now for the diamonds! Take the blue fabric, fold it and cut them into diamond shapes. Three go on the skirt and two go on the boots.
  6. After the diamonds are sewn on, draw on the details.
  7. Clip on the barrette and now you're done!
Hope you enjoyed, but stay tuned for the post! ^^

Monday, December 15, 2014

12 Cosplays of Christmas 2014 - 2 Giant Mechas (Neon Genesis Evangelion)

Day 2! ^^ Now if you guys are still in school, nothing spells out freedom like "winter break." Or "snow days," depending on where you live. For our last recipe before the last bell rings, we'll be focusing on the uniforms from 'Neon Genesis Evangelion!'

Here's a picture of Asuka. ^^ Many thanks to Japtou for letting me use this!
 
Here's a picture of Rei. ^^ Sorry, folks! I couldn't find a good picture of her and Asuka in their uniforms with socks. Many thanks to AmiAmi for letting me use this!
 
Here's what you need to assemble these:
  • A sky blue skirt
  • A white Polo shirt
  • Thick sky blue ribbon
  • Skinny red ribbon
  • White loafers (Rei) or black Mary Janes (Asuka)
  • Black or white socks
  • Red fabric markers
  • Safety pins
How to make these:
  1. Get dressed (save for the socks and shoes), but wear the skirt inside out. This'll help somebody safety pin the ends of the blue ribbon to it.
  2. Bring the blue ribbon over your shoulders and have somebody cut them. They can also safety pin the ribbon to the top of the skirt.
  3. Take off the skirt, turn it right side out and put it back on.
  4. Put on the socks and shoes. For the white socks, make a red line around and near the top of the socks using the marker.
  5. Make a bow using the red ribbon and now you're done!
Hope you all enjoyed! ^^
Next line: 3 Glittering Diamonds!

Sunday, December 14, 2014

12 Cosplays of Christmas 2014 - A Great Big Smashing Hat (Cerebella/Vice Versa *Skullgirls*)

Hey, guys! ^^ Bri here. Well, it's that magical time of year again. A time of pine trees, presents and a jolly fat man in a red suit. No, it's not Hiking In A Bad Track Suit Day. It's Christmas time! >w<

For those who don't know or just to refresh your memory, this is similar to the "13 Cosplays of Halloween" event from a couple months back. However, instead of horror and sci-fi being the focus, this selection is a bit more fun, lighthearted and has a bit more variety. This year's 12 Cosplays will be extra special since I'm gonna reveal my 100th post pretty soon!

Anyway, let's board the circus train to the North Pole and start things off with Cerebella and Vice Versa from "Skullgirls!"

Here's an official pic of them! ^^ Many thanks to the Skullgirls Wiki for letting me use this!

Here's a side profile of them! ^^ Many thanks to the Skullgirls Fanpop page for letting me use this!
 
Here's what you need for Cerebella:
  • A strip of black fabric (can be satin, a large ribbon or whatever fabric you want)
  • A short, orange strapless dress
  • White legwarmers
  • Brown and orange felt
  • Black thigh-high socks
  • Black or dark gray ankle boots (Side-zipping ones are recommended!)
  • Aqua green hairspray or an aqua green wig
  • Purple and black face paint
  • Dark purple eyeshadow
  • Aqua green lipstick and nail polish
Now here's what you need for her hat Vice Versa:
  • An orange beanie
  • Orange gloves
  • Black felt
  • Styrofoam balls
  • Paint or markers
  • Plush stuffing
  • Duct tape
  • Solvent-free glue
How to assemble Vice Versa:
  1. Put on the beanie. Cut out some black diamonds with the black felt and pin them to the gloves.
  2. Stuff the gloves with the stuffing. You can add bendable craft wire in them too if you want.
  3. Pin the gloves to the hat and have somebody run it through the sewing machine.
  4. Cut a Styrofoam ball in half and cut it into the shape of a skull. You can either draw the sockets and teeth with a black marker or you can cut the sockets and teeth and paint them. Either way, let them dry afterward.
  5. While the skull's drying, cut the other half of the Styrofoam ball and sculpt them into horns like in the pictures.
  6. When the paint or the ink's dry, glue the horns to the skull.
  7. Set the hat aside.
Now for Cerebella!
  1. Get dressed, save for the hat. For the leg warmers, put them on your arms instead.
  2. Take the fabric and loop it across the top of the dress and warmers. Pin down and sew the fabric by hand.
  3. With a marker, draw the blocks on the brown felt for the warmers. Think a pair of big, flat Lego blocks. Cut them out and pin them to the warmers, so they'll be to be sewn on.
  4. While somebody is sewing the blocks on, repeat step 2 with the orange and black felt. However, draw diamonds and triangles on the felt instead of the Lego shape. Pin the orange diamonds onto the socks and the triangles to the fabric.
  5. Repeat step 4 in Vice Versa's recipe for the skulls on Cerebella's boots. Tape them to where your calf and ankle meet on the front of your feet. Make sure you can still move!
  6. Now for the hair! You can either spray your hair green or put on a wig. Comb the color in and let it dry.
  7. After your spray is dry, do your makeup and nails.
  8. Put on the hat and, using some duct tape, tape the Styrofoam skull to the top of your forehead. Now you're done!
Hope you enjoyed! ^^
Next line: 2 Giant Mechas!

Friday, October 31, 2014

13 Cosplays of Halloween - Scarecrow (Batman: Arkham Asylum)

Day 13! ^^ The very last recipe of 13 Cosplays of Halloween 2014! Let's go crazy for one last time because today, it's Scarecrow from 'Batman: Arkham Asylum!'

 Here's a pic of him! Scary, huh? Many thanks to the Batman Wiki for letting me use this! ^^
 
Oh, here's a bit of a warning: If you suffer from any breathing problems (asthma, shortness of breath, etc.), this costume is not for you! Here's what you need:
  • A half-face dust respirator (like a Reinhardt mask without the goggle bit)
  • A burlap sack
  • Rope
  • Brown pants
  • A brown thin hoodie (Be sure nobody wants it anymore!)
  • Silver flats
  • Silver duct tape
  • Gray bandage wrap
  • Jello shot syringes (NO NEEDLES!)
  • Brown leather gloves
  • Scissors
  • Yellow rubber tubes
  • Clear plastic tubes
  • Yellow craft paint
  • A black fabric marker
  • Glue dots
Here's how to assemble him:
  1. Cut the burlap bag, so it'll look like a sheet of burlap. Put it on your face gently and have somebody trace around where your eyes and mouth are with the marker. They can cut those areas up when the tracing is done and the burlap is away from your face.
  2. After the mask is made, put on the dark brown hoodie. Cut it up so it looks shredded and tattered. The scraps can be used for Scarecrow's loincloth later on.
  3. Put on the pants and flats. Cut up the cut remains of the hoodie to make the loincloth.
  4. Put on the gloves and stick the Jello shot syringes inside the fingers. If the syringes fit, then pull them off and set them aside. I highly recommend that you use the wider ones, so your fingers won't get stuck inside them.
  5. Trace your wrist on the right glove, take it off and cut off the hand part of it.
  6. Now for the syringes of fear toxin! Fill the syringes and the plastic tubes with the craft paint, pour the paint out and leave them to dry. Put the gloves back on.
  7. If you know how to make knots, make a hangman's noose out of the rope and set it aside. Put the cut hoodie cloth from step 3, place it on the front of your pants and using some more rope, tie it to them.
  8. Wrap the duct tape around the flats. Wrap the bandage around your right hand, the pants and gloves. Do a 'flex test' to see if you can still move with the bandages. You still need to take off the costume for bathroom breaks.
  9. By now, the paint on the syringes is probably dry, so slip them into your left gloved hand. Use the glue dots to glue both painted plastic tubes to the bandages.
  10. Measure how long the rubber tube is from your middle finger to the right tube. Cut it and tape it at both ends. Repeat with the rest until you get the desired look according to the picture.
  11. For the rest of the costume, put on the respirator and the shredded hoodie.
  12. Put down the hood and put the burlap mask over your face. Somebody can sew the mouth loosely so only the breathing cans are poking out. Put the hood back up, stuff any leftover burlap aside and now you're done!
Whoo... And I thought Painwheel had a lot of steps... -.- Anyway, here's a tip: If you get ever hungry or thirsty, pull the burlap off, pull down the respirator and dig in. This can also be smart if you get sweaty and need to give your face some fresh air. ^^

Like I said in September, I'm gonna be take a bit of a break and prep for my annual '12 Cosplays of Christmas' event. Hope you enjoyed both this recipe and 13 Cosplays of Halloween 2014 and...

Havehappy Halloween! ^w^

Thursday, October 30, 2014

13 Cosplays of Halloween - Devil Jin (Tekken)

Day 12! ^^ One more recipe! Today, put up your dukes because it's Devil Jin from 'Tekken!'

Here he is! ^^ Many thanks to Fighters Generation for letting me use this!
 
Here's what you need to assemble him:
  • Fake ram horns *You can recycle the ones from the Motaro recipe!*
  • Black leather gloves
  • Plastic chains
  • Black and red jeans *Make sure the red jeans doesn't fit anymore!*
  • Black and red boots
  • Silver thread
  • Black angel wings
  • A brown belt
How to assemble him:
  1. Cut a flame design out of the red jeans and apply it to the black jeans. Have somebody pin it and they can run it through a sewing machine.
  2. Meanwhile, cut up the rest of the red jeans into strips and pin it to the gloves. After somebody is done with the jeans, hand the gloves over to them.
  3. Get dressed the rest of the way. Slip on the finished gloves, the wings, the chains and the horns and now you're ready to fight!

Hope you enjoyed!
Next character: You'll see...

Wednesday, October 29, 2014

13 Cosplays of Halloween: Couples' Crypt - Arthur/Firebrand (Ghosts 'n' Goblins/Ultimate Marvel vs. Capcom 3)

Day 11! ^^ Let's take one more trek into the Couples' Crypt and defeat some demons because today, it's Arthur and Firebrand from 'Ghosts 'n' Goblins!'

Here's Arthur! ^^ This is his Marvel vs. Capcom 3 design, which will be used as a model for the first recipe. Many thanks to Fighters' Generation for letting me use this!
 
Here's Firebrand! ^^ Much like Artie, this is his Ultimate MvC3 design, which will be the model for the second recipe.
 
What you need to assemble Arthur:
  • A metal or plastic handled broom
  • Cardboard
  • Duct tape
  • A fake beard in red or brown
  • A black jumpsuit
  • A bike helmet
  • A brown belt
How to assemble him:
  1. Put on the beard, the suit and helmet. Cut up some cardboard and you can cover it in the duct tape.
  2. Once the cardboard's covered, have somebody help with the arranging and taping the pieces together. Make sure you can still move with all that cardboard! >w< Do the same thing with the broom for your lance.
  3. Put on the belt and now you're done!
Now for Firebrand! Like the 'MediEvil' gargoyle last year, I'll go in the Kigurumi direction for him, so here's what you'll need:
  • A pair of red hooded pajamas (must be "feetie" for best results)
  • Cardboard
  • Black and white craft paint
  • White, silver and red felt
  • Fabric glue
  • Fishing line
How to assemble him:
  1. Put on the pajamas.
  2. Cut up the cardboard into bat wings.
  3. Grab a smock and begin painting the inside of the wings black. Once the black paint is dry, paint the rest of the wings with the white paint and let it to dry.
  4. Now what to do with the felt! Cut the white felt into triangles and glue it to the feet part of the PJs. These will be Firebrand's claws! Cut the remaining felt to make the eyes and glue them to the hood.
  5. Cut the silver felt and gently wrap it around your ankles and wrists. Somebody can help you sew the ends of them together. Now you have the cuffs!
  6. Cut the red felt for the ears. Somebody can help with the locating of your ears and sewing of the costume's ears.
  7. Now for the wings! Check if the paint is dry on both of them. If so, somebody can sew them onto your PJs and secure them using the fishing line. Now you're done!
And now to barricade the Couples' Crypt for another year! ^^ Hope you enjoyed!
Next character: Devil Jin (Tekken)!

Tuesday, October 28, 2014

13 Cosplays of Halloween - Brooke (One Piece)

Day 10! 3 more recipes! ^^ Today, let's sing ourselves a mighty sea shanty because it's Brooke from 'One Piece!'

Here he is, pre-timeskip! ^^ Many thanks to the One Piece Wiki for letting me use this!
 
Here he is, post-timeskip! ^^ Many thanks to AnimeVice for letting me use this!

Here's another view of his post-timeskip form! ^^
 
Here's what you need to assemble both forms:
  • A skull mask (no bleeding ones!)
  • A ribs T-shirt
  • Skeleton hand gloves
  • A black suit with a gold or orange trim
  • Blue fabric
  • A string of elastic
  • Purple beads
  • Black boots
  • A black top hat
  • A black afro wig
  • A cane
For his timeskip form, here's the additional things you'll need:
  • A white top hat
  • A large crown
  • Yellow fake heart-shaped glasses
  • Red or pink cellophane
  • An orange feather boa
  • Cardboard
  • Green, white and black craft paint
  • Fishing line
  • Red floral print pants

How to assemble him:
  1. Get dressed, save for the gloves, mask, wig and hat.
  2. String a bunch of the beads and tie it together, so you'll have something like a bracelet. Bunch the blue fabric and tie the string of beads.
  3. Now that you have your frills, take a safety pin and pin it to the shirt.
  4. Time for the mask and the wig! Put on the mask first and then secure the wig on your head.
  5. Put on the hat, grab a cane and you're done with the standard look for Brook!
For the post-timeskip form:
  1. Do steps 1-3 of the standard Brook recipe. For the shirt part, substitute the orange for white or silver.
  2. Slip the crown through the hat and trace the top of it. Remove the crown and cut the hat according to the tracing. Slip the crown back on.
  3. For the sunglasses, glue a couple of small cellophane sheets to the glasses and set them aside so the glue can dry.
  4. Have somebody cut up the cardboard into different pieces and paint them for Brook's guitar. After the paint's dry, glue some fishing line for strings and leave it to dry.
  5. When the glue on the glasses is dry, trim the cellophane so they look like actual lenses.
  6. Put on the mask, wig and gloves, along with the boa. Slap on the glasses and hat, grab your guitar and now you're done!
Hope you enjoyed! ^^ Yohohohoho!
Next characters: Arthur/Firebrand (Ghosts 'n' Goblins)!

Monday, October 27, 2014

13 Cosplays of Halloween - Alucard (Hellsing)

Day 9! ^^ Only 4 more recipes left for this year's petrifying posting spree! Anyway, keep that garlic and those crucifixes handy because today, it's Alucard from 'Hellsing!'

Here's a pic of him! ^^ Many thanks to Absolute Anime for letting me use this!
 
Here's what you need:
  • A gray or black suit
  • A white dress shirt
  • Red ribbon and pink, brighter red, orange or salmon colored ribbon
  • Black boots
  • A red trenchcoat
  • A red sunhat
  • Any black goggles with amber lenses
  • White gloves
  • A black fabric marker
This one's super simple, so there aren't that many directions. How to assemble him:
  1. Get dressed.
  2. Have somebody wrap the ribbon around the brim of the hat and sew the ends together. The ribbon should be enough to do at least two layers.
  3. Take off the gloves on your dominant ("writing") hand and using the marker, draw the insignia on the top of your other glove. Put the first glove back on.
  4. After the gloves are done, feed the red ribbon through the collar of the dress shirt and make a bow.
  5. Put on the boots, grab some fake guns and maybe some fake vampire teeth and now you're done!
Hope you enjoyed and hope you find your Seras... <3
Next character: Brooke (One Piece)!

Sunday, October 26, 2014

13 Cosplays of Halloween: Uniforms of the Undead - Day/Night Uniforms (Vampire Knight)

Day 8! ^^ It's a little bit of a crash course today because it's the Day and Night uniforms from 'Vampire Knight!'

Here's the cast! ^^ The Night uniforms are white lined with black and the Day uniforms are black lined with white, just so you know.
 
Here's what you need:
  • A suit *boys* (girls need only the top part)
  • A skirt *girls*
  • Black or white and red ribbon
  • A black dress shirt
  • Black long socks *girls*
  • Brown boots *girls*
  • Black shoes *boys*
Here's how to assemble them:
  1. Get dressed, save for the jacket and the white shirt.
  2. This step is optional if your suit is already lined with black or white, but let's continue if it isn't. Have somebody help you arrange, cut up and sew the black and white ribbon on.
  3. Once the ribbon is done, get dressed the rest of the way. Style your hair to whatever you want (either a character do or your usual do), tie a red bow to the collar of the jacket and now you're done!
Hope you enjoyed and remember to keep that garlic handy! ^^
Next character: Alucard (Hellsing)!

Saturday, October 25, 2014

13 Cosplays of Halloween - Motaro (Mortal Kombat: Armageddon)

Day 7! ^^ We've hit the week mark! Today, let's trek into Outworld because it's Motaro from 'Mortal Kombat Armageddon!'

Here's a full pic of him! ^^ Many thanks to the Mortal Kombat Wiki for letting me use this!
 
Here's what you need for him:
  • Fake ram horns
  • Silver cuff bracelets
  • Braided water line hoses (can be found at Home Depot, Lowe's, Ace or any hardware store)
  • Duct tape
  • A knife or a saw
  • Brown tights
  • Pillows
  • Black fabric
  • Scissors
  • Fishing line
  • Black shoes
How to assemble him:
  1. Put on the tights first and stuff them with the pillows. This will give the illusion of muscular legs, like a bull's. Do NOT overstuff them, the legs will rip and you won't feel your legs!
  2. Wrap the fabric around your waist and have somebody draw a loincloth shape. Cut it out and sew it together.
  3. Now for the tail. Cut off the metal ends with a saw or a knife, cut some duct tape and tape two of the ends together. You can add more for a longer tail.
  4. Wrap the tubes with the duct tape until you get the desired thickness. Stick a couple strips of tape at the end and cut out a spade shape.
  5. You can sew the tail onto the tights with the fishing line. Just be careful!
  6. Put on the horns, the shoes and the bracelets and now you're done!
Hope you enjoyed! ^^
Next character: 'Vampire Knight' uniforms!

Friday, October 24, 2014

13 Cosplays of Halloween: Couples' Crypt - Kitaro/Neko Musume (GeGeGe no Kitaro)

Day 6! ^^ We have the hit the halfway mark! Time to light some lanterns and march through the cemetery because today, it's Kitaro and Neko Musume from 'GeGeGe no Kitaro!'

Here's some designs of Kitaro. ^^ The fifth design (from the 2007 version of the anime) will be the focus on the recipe. Many thanks to Anime Nation for letting me use this!
 
Here's the design of Neko Musume from the 2007 version! ^^ Many thanks to the Gegege no Kitaro Wiki for letting me use this!
 
Here's what you need for Kitaro:
  • A dark blue dress shirt
  • Matching shorts
  • A yellow reflective vest
  • Black duct tape
  • Flip-flops
  • A short brown wig
How to assemble him:
  1. Get dressed.
  2. Put on the vest and measure out the duct tape. Somebody can help out with putting the tape on the vest.
  3. Now for the wig. Put it on and brush the hair over your left eye. Slap on some flip-flops and you're done!
Now for Neko Musume! ^^ Here's what you need for her:
  • A white dress shirt
  • A pink overall dress
  • Red or pink skinny ribbon
  • Matching pink thick ribbon
  • A short red wig
  • Pink flats
  • Matte yellow eyeshadow (optional)
  • A black eye pencil (optional)
  • Fake vampire teeth (optional)
  • Glue stick (optional)
How to assemble her:
  1. Get dressed.
  2. Measure out the amount of both the skinny and thick ribbon for the shirt and the hair. Cut the desired amount and set aside for later.
  3. For the hair, put on the wig and tie the thick ribbon to a large bundle of strands. You can use your actual hair too, but it would need to be short and red or black (like the older designs of Neko).
  4. Feed the skinny ribbon through the collar and tie it to a bow. Not too tight, though! Put on the shoes and you're done!
  5. Now, here are the optional steps to make her monster form! Cover your brows with the glue stick and wait for it to dry.
  6. When the glue's dry, cover the top lids and half of the brows with the eyeshadow. These will be the base of her eyes.
  7. Take the eye pencil and trace the upper half of your brows and the top of your lashes. Finish it off with gently putting a vertical line through the upper lid and some vampire teeth in your mouth. Now you're done!
Hope you enjoyed! ^^
Next character: Motaro (Mortal Kombat Armageddon)!

Thursday, October 23, 2014

13 Cosplays of Halloween - Painwheel (Skullgirls)

Day 5! ^^ Today is gonna be a bit breezy because it's Painwheel from 'Skullgirls!'

 Here she is. ^^ Many thanks to the Skullgirls Wiki for letting me use this!
 
NOTE: If you're allergic to latex or tin, this recipe is NOT for you! Here's what you need for her:
  • Brown, black, silver and red face paint
  • Tinfoil
  • A pale green halter dress
  • A brown and black eyeliner pencil
  • Black wristbands and anklebands
  • Rubber tubes
  • Cardboard
  • Silver and black craft paint
  • Skinny black PVC pipe
  • Bobby pins
  • White fabric
  • Liquid latex (found at Spirit or can ordered online)
  • Tweezers
  • Red contact lenses
How to assemble her:
  1. Start by cutting the cardboard into four scythe-like shapes and a couple of large squares. Arrange the scythes into a pinwheel formation, apply some glue on each blade and sandwich them in-between the squares.
  2. After the glue is dry, begin painting the cardboard pinwheel with the silver craft paint. Leave it to dry when you're done and repeat on the other side afterwards.
  3. Cut up some more cardboard, but this time into a bunch of disks and paint them black. These will serve as the top of the nails. Leave them to dry too.
  4. Put on the dress, the wristbands and the ankle bands. Cut off the cord if the ankle bands have it.
  5. Put your hair up in a messy bun or whatever updo you want. Cover it with the white fabric and pin it in place.
  6. Put in the contact lenses.
  7. Now for the 'mask!' Cut up some tinfoil and apply it to different places on your face and apply the liquid latex around each strip. Have somebody mix some brown and black face paint and apply in onto your face. The same could be done for the lips, but simply paint on some stripes with some silver face paint instead of using latex and tinfoil. Afterwards, use a black eyeliner pencil to make the 'mask' look patched up.
  8. Now for the nails! Cut up the pipe and glue the disks onto any end of the mini pipes.
  9. Place one of the fake nail on any part of your body. Have somebody apply the latex onto the base of them. Hold it in place and let it dry, so it'll stick. Repeat with the other 'nails.'
  10. Now for that behemoth painted cardboard pinwheel to come back! Have somebody help you out on this one! Shape the rubber tube to a backwards S and sew it to the back of the dress with some fishing line. Hold onto the other end of the tube, apply some glue on it and slowly put the pinwheel on top of it.
  11. After the glue's dry, draw different lines on your arms and legs using a brown eyeliner pencil to make the veins and now you're done!

Oh, boy... That was the longest recipe I've ever typed out. -.- Anyway, hope you guys enjoyed! ^^
Next characters: Kitaro/Neko Musume (GeGeGe no Kitaro)!

Wednesday, October 22, 2014

13 Cosplays of Halloween: Couples' Crypt - Dante/Trish (Devil May Cry)

Day 4! ^^ Today, it's another trip to the Couples' Crypt, armed to the teeth, because it's Dante and Trish from 'Devil May Cry!'

Here's Dante! ^^ This is the 'Marvel vs. Capcom 3' design. Many thanks to the Marvel vs. Capcom Wiki for letting me use this!
 
Here's Trish! ^^ Much like Dante, this is her design from 'Marvel vs. Capcom 3.' Many thanks to The Fighters Generation for letting me use this!
 
Here's what you need for Dante:
  • A red trench coat
  • Silver hairspray
  • Brown craft leather
  • Black or brown pants
  • Black boots
  • Fake weapons
How to assemble him:
  1. Get dressed.
  2. I highly suggest getting somebody who's great with leather to help you out on making the leather straps.
  3. Once the straps are done, fit them over your shoulders and across your chest. If they fit, sew them together.
  4. Grab some fake swords and fake guns and now you're done!
Now for Trish! Here's what you need for her:
  • A black tube top or corset
  • Black shiny pants
  • Black knee-high boots
  • Black satin or cotton
  • Black elbow-length gloves
  • A black belt
Here's how to assemble her:
  1. Get dressed. Have somebody draw a lightning bolt shape starting at the top and end about halfway through, using some fabric chalk.
  2. Afterwards, take the gloves, cut off the hand parts and put them on.
  3. Cut the bolt shape off the top. For extra cleavage, wear a strapless bra.
  4. Grab some sunglasses and a fake gun and now you're done!
Hope you enjoyed! ^^
Next character: Painwheel (Skullgirls)!

Tuesday, October 21, 2014

13 Cosplays of Halloween - NES Jason (Friday the 13th *NES*)

Day 3! ^^ Time to blow the dust off that old NES because today, it's Jason from the NES game 'Friday the 13th!'

Here's a picture of the NES Jason figure that NECA released last year. ^^ This will be the model for this recipe. Many thanks to The Manchester Morgue for letting me use this!
 
Here's what you'll need to assemble him (Not the figure!):
  • Purple face paint
  • A white collared button-up shirt
  • White pants
  • Purple cloth dye
  • Blue glow-in-the-dark craft paint
  • A plastic Jason mask
  • Glow-in-the-dark gloves
  • White or bright shoes
How to assemble:
  1. Begin by painting the shoes and the mask with the glow-in-the-dark paint. Afterwards, set it outside so the paint can both dry and gain its glow. For the mask since it's made of plastic, it's best to put it in the shade so it won't melt.
  2. Another thing to do outside is prep the dye to use the shirt and pants. Once the dye's ready, dunk them in. Be careful because dyes can splash and stain your clothes and flooring!
  3. When you get the desired shade of purple on the clothes, hang them up on a clothesline so they can dry. If not, let the clothes dry anyway, dunk them back in when they're dry and continue the cycle until you get the desired purpliness.
  4. When the clothes are dry, put them on. Bring in the mask and shoes so they can cool from the sun and put them on when they are. Slap on the gloves, grab a fake machete and you're ready to go!
Hope you enjoyed! ^^
Next characters: Dante and Trish (Devil May Cry)!

Monday, October 20, 2014

13 Cosplays of Halloween - Morrigan Aensland (Darkstalkers/Vs. Capcom series)

Hey, guys! ^^ Day 2! Today, we'll be exploring the highlands of Scotland because the character of the day is Morrigan Aensland from 'Darkstalkers' and the 'Vs. Capcom' series!

Here's her 'Tatsunoko vs. Capcom' look. ^^ This will be the model for this recipe.
 
Here's another picture of her from 'Tatsunoko vs. Capcom.' ^^ Many thanks to The Fighters Generation for letting me use this!
 
Here's what you need to assemble her:
  • A black strapless swimsuit
  • White faux fur
  • Orange gloves
  • Purple, pink or magenta yoga pants or tights
  • Black boots
  • Fake bat wings
  • Green hairspray
  • Black headband
  • Fake bats
  • Purple fabric marker
  • Black and white fabric chalk
How to assemble her:
  1. Let's work on the headband. Take a fake plastic bat, cut off the wings and glue them onto the headband. Set them aside so the glue can dry.
  2. Put on the swimsuit and tights. Have somebody draw a V shape across your chest and a heart below it with the white chalk. Once they're done, have them carefully cut it out.
  3. Draw some bats on the tights using the marker. Think Batman bats, but purple. You don't cut these!
  4. Put on the gloves. Using the black chalk and some scissors, transform them into fancy fingerless gloves. You know, the ones with the ring around the middle finger?
  5. Onto the fur! Cut some lines on it (not all the way!) so it looks frilly. Somebody can help pin or sew it on (be careful!).
  6. Grab a towel, wrap it around your neck and spray your hair with the green spray. You can either do this yourself or have somebody do this for you. Afterwards, comb it so it's distributed evenly, wash out the comb and leave your hair to dry.
  7. After your hair is nice and green, strap on the fake bat wings and the headband, put on the boots and now you're done!
Hope you enjoyed! ^^
Next character: NES Jason (Friday the 13th NES)!

Sunday, October 19, 2014

13 Cosplays of Halloween: Couples' Crypt - Sunflower/Zombie (Plants vs. Zombies)

Hey, guys! ^^ Bri here. It's time to break out the pumpkins, fake spiders and bowls of candy because it's time for 13 Cosplays of Halloween 2014! If you're new to this or just wanna refresh your memory, I'll explain it. ^^ Up until Halloween, I post new recipes not just for conventions in October. They can also be used for costume ideas while passing out treats for every little Draculaura and Red Bird that comes to your door.

To start off this year's 13 Cosplays event, let's head into the Couples' Crypt. ^^ Now let's grab our gloves, shovels and watering cans because today it's the Sunflower and the Zombies from 'Plants vs. Zombies!'

 
Here's a Giant Sunflower and a Zombie. ^^ The sunflower will be the focus on the first recipe.
 
Here's just a generic Zombie. ^^ He'll be the focus on the second recipe. Many thanks to the Plants vs. Zombies Wiki for letting me use this picture and the one far above!


Here's what you need for the Sunflower:
  • Green clothing
  • Brown or white headband
  • Felt in yellow and green
  • Black and brown fabric marker
How to assemble the Sunflower:
  1. Cut up some petal shapes (cloud shape if you wanna be faithful to the original design) with the yellow felt.
  2. Cut out the same petal shape out of the green felt for the leaves. For gloves, you can add a little thumb piece to four of them. Somebody or you can sew the four "leaves" together and you'll get two mittens.
  3. Glue the yellow petals to the headband. If you're using a white headband, use a brown fabric marker and leave it dry before gluing the petals onto it.
  4. While you're waiting, get dressed and if the leaf mittens are already done, put those on.
  5. If the glue's dry, put on the headband and you're done!
Now for the Zombie! Here's what you need for it:
  • Face paint in green, black and white
  • Fake teeth
  • Brown jacket and shoes
  • Old blue jeans
  • Gray or white shirt
  • Red tie
  • Bald cap

How to assemble it:
  1. Put on the bald cap and tuck in any stray hairs.
  2. Once the cap is snug, now for the paint! Mix some black, green and white face paint on a paper plate with a makeup brush and paint away! You should have this nice grayish-green color all over yourself.
  3. Now for the clothes! Cut them up so they can look tattered and old. If you want, cover the clothes in dirt and mud to make them look very dirty.
  4. Once the dirt's shaken off, time to get dressed. For the pants, slip on the cut bit after you put them on. Adjust the tie, slip on the fake teeth and you're done!
Now you're ready to defend the yard! Hope you enjoyed! ^^
Next recipe: Morrigan (Darkstalkers)!