Monday, October 20, 2014

13 Cosplays of Halloween - Morrigan Aensland (Darkstalkers/Vs. Capcom series)

Hey, guys! ^^ Day 2! Today, we'll be exploring the highlands of Scotland because the character of the day is Morrigan Aensland from 'Darkstalkers' and the 'Vs. Capcom' series!

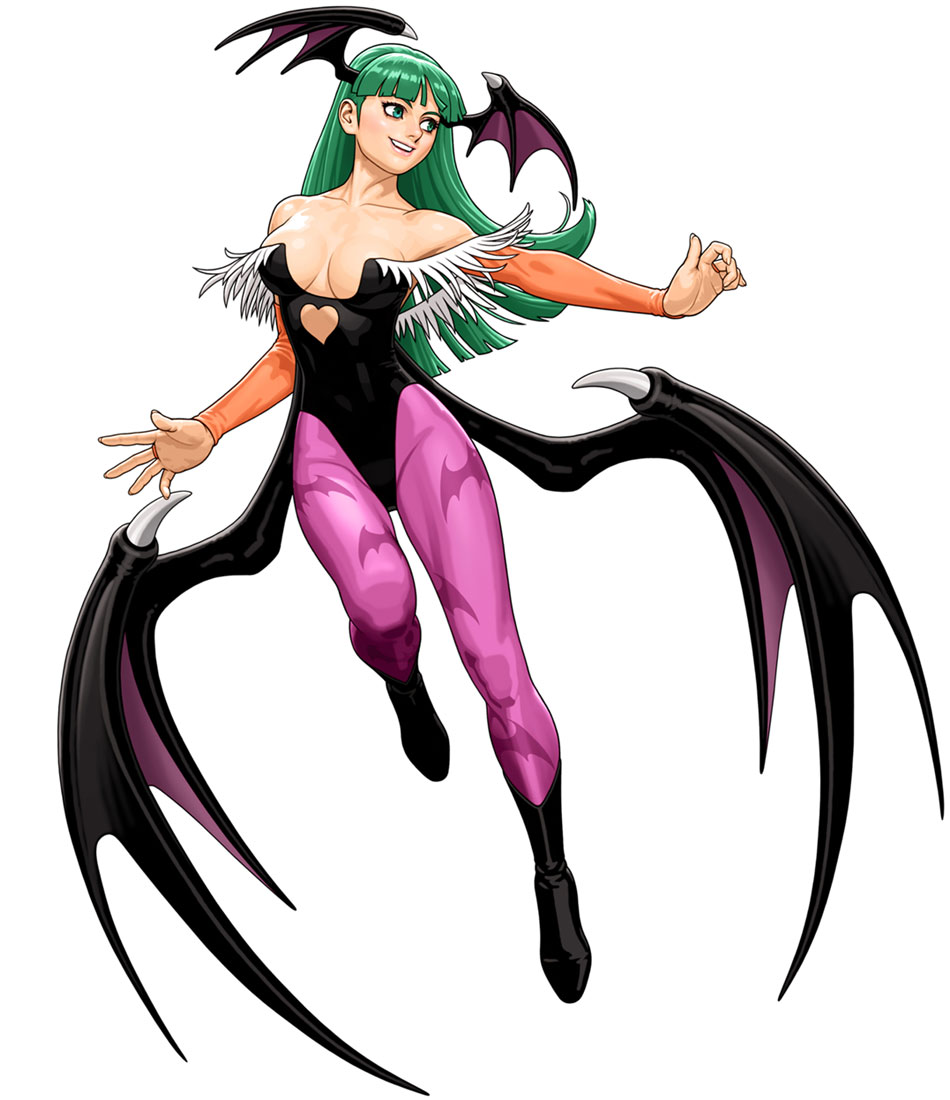
Here's her 'Tatsunoko vs. Capcom' look. ^^ This will be the model for this recipe.
 
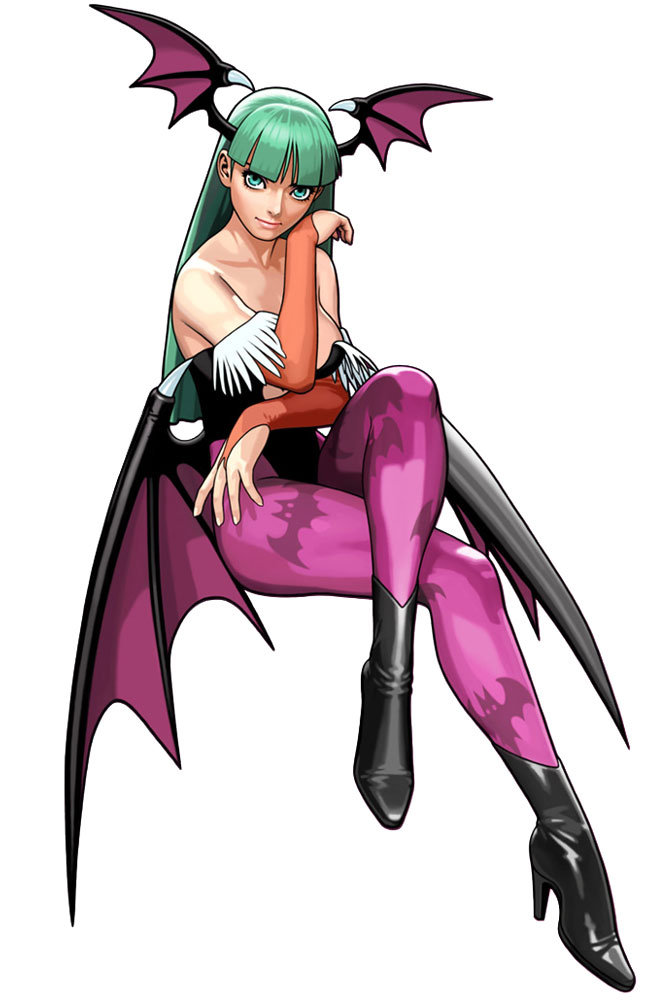
Here's another picture of her from 'Tatsunoko vs. Capcom.' ^^ Many thanks to The Fighters Generation for letting me use this!
 
Here's what you need to assemble her:
  • A black strapless swimsuit
  • White faux fur
  • Orange gloves
  • Purple, pink or magenta yoga pants or tights
  • Black boots
  • Fake bat wings
  • Green hairspray
  • Black headband
  • Fake bats
  • Purple fabric marker
  • Black and white fabric chalk
How to assemble her:
  1. Let's work on the headband. Take a fake plastic bat, cut off the wings and glue them onto the headband. Set them aside so the glue can dry.
  2. Put on the swimsuit and tights. Have somebody draw a V shape across your chest and a heart below it with the white chalk. Once they're done, have them carefully cut it out.
  3. Draw some bats on the tights using the marker. Think Batman bats, but purple. You don't cut these!
  4. Put on the gloves. Using the black chalk and some scissors, transform them into fancy fingerless gloves. You know, the ones with the ring around the middle finger?
  5. Onto the fur! Cut some lines on it (not all the way!) so it looks frilly. Somebody can help pin or sew it on (be careful!).
  6. Grab a towel, wrap it around your neck and spray your hair with the green spray. You can either do this yourself or have somebody do this for you. Afterwards, comb it so it's distributed evenly, wash out the comb and leave your hair to dry.
  7. After your hair is nice and green, strap on the fake bat wings and the headband, put on the boots and now you're done!
Hope you enjoyed! ^^
Next character: NES Jason (Friday the 13th NES)!

Sunday, October 19, 2014

13 Cosplays of Halloween: Couples' Crypt - Sunflower/Zombie (Plants vs. Zombies)

Hey, guys! ^^ Bri here. It's time to break out the pumpkins, fake spiders and bowls of candy because it's time for 13 Cosplays of Halloween 2014! If you're new to this or just wanna refresh your memory, I'll explain it. ^^ Up until Halloween, I post new recipes not just for conventions in October. They can also be used for costume ideas while passing out treats for every little Draculaura and Red Bird that comes to your door.

To start off this year's 13 Cosplays event, let's head into the Couples' Crypt. ^^ Now let's grab our gloves, shovels and watering cans because today it's the Sunflower and the Zombies from 'Plants vs. Zombies!'

 
Here's a Giant Sunflower and a Zombie. ^^ The sunflower will be the focus on the first recipe.
 
Here's just a generic Zombie. ^^ He'll be the focus on the second recipe. Many thanks to the Plants vs. Zombies Wiki for letting me use this picture and the one far above!


Here's what you need for the Sunflower:
  • Green clothing
  • Brown or white headband
  • Felt in yellow and green
  • Black and brown fabric marker
How to assemble the Sunflower:
  1. Cut up some petal shapes (cloud shape if you wanna be faithful to the original design) with the yellow felt.
  2. Cut out the same petal shape out of the green felt for the leaves. For gloves, you can add a little thumb piece to four of them. Somebody or you can sew the four "leaves" together and you'll get two mittens.
  3. Glue the yellow petals to the headband. If you're using a white headband, use a brown fabric marker and leave it dry before gluing the petals onto it.
  4. While you're waiting, get dressed and if the leaf mittens are already done, put those on.
  5. If the glue's dry, put on the headband and you're done!
Now for the Zombie! Here's what you need for it:
  • Face paint in green, black and white
  • Fake teeth
  • Brown jacket and shoes
  • Old blue jeans
  • Gray or white shirt
  • Red tie
  • Bald cap

How to assemble it:
  1. Put on the bald cap and tuck in any stray hairs.
  2. Once the cap is snug, now for the paint! Mix some black, green and white face paint on a paper plate with a makeup brush and paint away! You should have this nice grayish-green color all over yourself.
  3. Now for the clothes! Cut them up so they can look tattered and old. If you want, cover the clothes in dirt and mud to make them look very dirty.
  4. Once the dirt's shaken off, time to get dressed. For the pants, slip on the cut bit after you put them on. Adjust the tie, slip on the fake teeth and you're done!
Now you're ready to defend the yard! Hope you enjoyed! ^^
Next recipe: Morrigan (Darkstalkers)!

Tuesday, September 2, 2014

Back to School 2014 - Boys' Uniform (Melancholy of Haruhi Suzumiya)

Hey, guys! ^^ Here's part 2 of my Back-To-School recipes! Since I covered the girls a couple weeks ago, I'll be covering the boys' uniforms today.

Here's a picture of Haruhi (see previous post for her uniform!) and Kyon, which will be our model. ^^ Many thanks to Eleven Tsuki for letting me use this!
 
 
What you need to assemble it:
  • A dark blue blazer
  • A white long-sleeved shirt
  • A red tie
  • Black pants
  • Brown loafers
How to assemble:
  1. Get dressed.
  2. Tie your tie.
  3. Put on your shoes, adjust the tie and cuffs and now you're done!
For the rest of the month, I'll be working on this year's 13 Cosplays of Halloween, so keep your eyes peeled. ^^ Hope you enjoy and have a great first day of school!

Monday, August 25, 2014

Back to School 2014 - Girls' Uniform (Melancholy of Haruhi Suzumiya)

Hey, guys! ^^ Bri here! Ah, the first day of school... Kids in those new Skylanders shirts and jeans, their fresh backpacks with supplies and notebooks. So in honor of the return to campus, I will be releasing two school uniform recipes (one for the girls today and one for the boys on the 9th of September). You can use these for either back to school or for August and September cons.

To open the school year the otaku way, we'll be focusing on the girls' uniform from 'The Melancholy of Haruhi Suzumiya.'

Here's the two variations of the uniform. ^^ Many thanks to EZ Cosplay for letting me use this! 
 
Here's what you'll need:
  • A bright blue skirt
  • A white long sleeved shirt
  • Bright blue fabric
  • Ribbon in red, yellow and white
  • Black socks
  • Brown loafers
  • A red fabric marker
 

How to assemble it:
  1. Cut up some of the red and white ribbon for the blue fabric. Have someone help with ironing or sewing it on.
  2. Get most of the costume on. Cut up some of the yellow ribbon and tie up your hair with them.
  3. Now for the tricky part. Have somebody align the fabric to match the picture above. Make a bow with another strip of red ribbon and sew it on.
  4. With the marker, make an Old English 'M' on the white-ribboned fabric. Now, you're done!
In a couple weeks, I'll post the uniforms for the boys! ^^ Hope you've enjoyed!

Tuesday, July 8, 2014

"Star Light, Star Bright, First Star I See Tonight..."

"...Wish I may, wish I might, wish the wish I wish tonight."

Hey, guys! ^^ Bri here! Well, yesterday was Tanabata, so sorry for this late post. ^^; For those who don't know what it is, I posted a brief description of it on my previous post.
However, to refresh your memory, it's sort of like a real-life Wish Day (if anybody else is a Wuzzles fan, you'd remember that.). During this day, everybody make origami, write down their deepest wish on a strip of paper and hang them up on bamboo or tree branches. And all this centered around a couple that are forced to meet each other once a year.

And now, to unveil my Tanabata display! *drumroll*

The main branch itself. ^^ I can explain below what everything is.
 
My Build-A-Bears Daryl and Steven as Orihime and Hikoboshi. ^^
 
A Spiderman-themed fukinagashi I made myself. This one was so hard to make! -.-


I know it doesn't look like much, but this was hard work and actually a lot of fun to do. I found an old tree branch since there are no fake bamboo stalks sold in my local craft stores. I cut and folded different things out of construction paper. Best of all, I let my imagination run wild!

Around this holiday, different decorations symbolize either a wish or something related to the story. The decorations I used include:
  • Strips of paper (Tanzaku) - used to represent the wish for better handwriting and better studies, but today it's used to write down someone's most precious wish
  • Fishing net (Toami) - better fishing and healthy crops, but supposedly represents the Milky Way
  • Money purse (Kinchaku) - to be prosperous and rich
  • Chains - also represents the Milky Way
  • Streamer ball (Fukinagashi) - represents Orihime's weaving fabric
Now for big news before wrapping this up! Starting next month and September, I'll start making a couple school uniform recipes for you guys. I'll start planning for the annual '13 Cosplays of Halloween' in September, too. Hope y'all have a great summer and...

あなたが良い七夕を持っていた願っています!
(Hope you had a good Tanabata!)

Friday, July 4, 2014

Fireworks and Stars and Strips, Oh My!

Hey, guys! ^^ I'm back from my long hiatus! Well, briefly. Anyway, today's Independence Day. ^^ For my friends overseas, Independence Day honors America's fight for independence from England (sorry if I upset anybody from across the pond! ^^;). Nowadays, it's a common BBQ holiday, like many holidays here in America. Every year the night sky is filled with the BOOMs and flashes of fireworks as people nibble on hot dogs, burgers and watermelon (common summer staples here in the States).

For my friends over in Japan, it's also three days until the holiday of Tanabata (Star Festival). On this day, people display their deepest wishes by tying origami and strips of paper to bamboo and trees. Sorta similar to how people decorate pine trees and spruces for Christmas.
Another trait that both Tanabata and Christmas share is that they have stories that are traditionally told on that day. During Tanabata, it's a love story about a weaver and a shepherd (or a cow herder) that are forced to meet once a year.

I'll do a follow-up post in a few days where I'll show you all my Tanabata tree. ^^ Until then...
Have a great and safe Independence Day! [|:3>

Sunday, April 20, 2014

Easter 2014 - Berii Shirayuki (Tokyo Mew Mew A La Mode)

Hey, guys! ^^ Bri here. Today, it's a day full of eggs, candy and bunnies! Yep, it's Easter! ^^ And speaking of bunnies, we'll be focusing on my favorite Mew Mew, Berii Shirayuki.

Here's a picture of her! ^^ Many thanks to Zerochan for letting me use this!
 
Sadly, I couldn't find a good colored picture of her, so just bare with me on this... Anyway, here's what you need for Berii:
  • A white or creamish-yellow balloon dress
  • Ribbon in both dress's colors and red
  • White lace
  • Round or 'jingle' bells
  • Matching white or yellow gloves
  • White or yellow boots
  • Bunny ears
  • A white cat tail
Here's how to assemble the costume:
  1.  Put on the dress and the boots. Have somebody cut up the gloves, so the cuffs look jagged and triangular.
  2. Take some ribbon (the one that's the same color as the dress), cut it off and make a couple tailless bows. Somebody can safety-pin these to the sides of your hips.
  3. Repeat step 2 with the red ribbon, but this time, the bows have tails. For the garter, line one strip of ribbon with the lace, sew it on and slip it onto your thigh. For the other one, tie it to your cat tail and sew on a small bell.
  4. Pin your tail to the dress, slip on some bunny ears and you're done! TIP: For a better effect, align the tail with your coccyx (a.k.a. your tailbone) and pin it there on the dress.
Hope you enjoyed and...
Have a happy Easter! =^v^=