Wednesday, October 31, 2012

13 Cosplays of Halloween: Uniforms of the Undead - Nurse (Silent Hill)

This is it, folks! Day 13 of '13 Cosplays of Halloween!' >w< And the character for the day is... *drum roll* the Nurses of 'Silent Hill!' This one's very, VERY easy because of the availability of materials and the wide variety of variations on the dress. Similar to how I used the designs of 'Resident Evil's' Jill from 'Marvel vs. Capcom 3,' I'll be using the Universal Halloween Horror Nights version of the Nurses, as well as the game version. This isn't for kids like the Perona recipe, this one's strictly for teens and adults!

Here's an official picture of a Nurse from Universal. Many thanks to SkewedNet.com for letting me use this!

A Nurse from 'Silent Hill: Homecoming.'

What's needed to become a Nurse:
  • A white dress (a regular nurse costume will work too!)
  • Some gray paper (Optional)
  • Defrosted steak or red cloth dye
  • Beige heels
  • Some dirt or mud (found in your backyard)
  • Non-stick bandages (found at Rite Aid, Walgreen's, CVS or any drugstore)
  • Fake knife or fake machete
How to become one:
  1. Open the package of defrosted steak and set the meat aside. There should be blood from the meat at the bottom of the package.
  2. Take the dress and use the blood to coat it. This will give the dress a very dingy and very dirty look, like it's been stained in human blood. To make it bloodier, wrap the dress around the steak and roll it around, both front and back. If you prefer not using steak for the blood, make some red cloth dye, dip the dress in it and leave it until you get a bloodied look on it. Hang the dress to dry (steak-ed or dyed).
  3. Make a sailor hat out of some gray construction paper, snip off the top peak and tape the top closed. Take a red crayon or colored pencils and lightly draw some scratches and splashes on the finished hat. If you already have a nurse hat, dip it into some leftover meat blood or into some red dye until you get the bloody look on it.
  4. Take the dress (and nurse costume hat) outside, roll them around in the dirt or add some mud on it and shake it out to get rid of any excess dirt. Again, we have to make the dress as dirty as possible, so it'll look like years and years of spilled blood.
  5. After you get a wig cap on and your hair's tucked in, have a friend or a parent take the bandages and wrap your face. Make sure they leave some mouth and nose holes so you can breathe, as well as an eye hole so you can see. You can use a clear mask and wrap your head with it on, too. ^^
  6. Get your shoes and hat on, grab your fake knife and you're done!
This is a very awesome and scary addition to any Halloween party, anime convention or gathering! >w<

So I hope you all have enjoyed my '13 Cosplays of Halloween' event. I'll be doing something similar to this in December, so stay tuned.

Have a happy Halloween, everyone! ^w^

Tuesday, October 30, 2012

13 Cosplays of Halloween - Jill Valentine (Resident Evil)

Day 12! ^^ One more recipe! The character for today is Jill Valentine of 'Resident Evil.' We'll be using the 'Marvel vs. Capcom 3' designs of her for these recipes.

Here's what you get when you first download her in 'Marvel vs. Capcom 3.' Many thanks to Creative Uncut for letting me use this!

Here's one of her DLC costumes in the game. This one's VERY easy to do. Many thanks to the Marvel Universe Forums for letting me use this!

Jill in her S.T.A.R.S costume. Very unsure if this is included in-game. Many thanks to GameInformer for letting me use this!

What's needed to suit up (first suit):
  • A blue one-piece swimsuit
  • Black tights (black skinny jeans will work too!)
  • Matching blue boots
  • Duct tape in both blue and black
  • A black long-sleeved shirt
  • Blue gloves or white gloves and blue cloth dye
  • Velcro strips
How to prepare:
  1. Get dressed, except for the gloves if they're white. If so, dip them into the dye, leave them until they get to the desired shade and hang them up to dry.
  2. Take the blue duct tape and have a friend or a parent wrap it around your shoulders and legs. Take a couple strips of the black duct tape and wrap them around the blue tape on both of your legs. Make sure the strips make a broad X-shape inside your thigh. Not too tight on the legs or else you'll cut the circulation on both legs and arms. ^^;
  3. Once you're done, check the gloves. If they're dry, then put them on.
  4. Take some Velcro strips and apply the loop side onto the tape of your left leg. Peel off the hook side, put a toy gun holster on it and press it down until the hook side can go off with the holster. Once that's done, grab a sci-fi toy gun, get your hair in a skinny ponytail and you're ready!
Now, for Jill's STARS outfit:
  • A dark blue beret
  • A bright blue shirt
  • Black or dark blue jeans
  • Black combat boots
  • Black fingerless gloves
  • A fabric marker in blue
  • Cardboard or posterboard
How to suit up:
  1. Get dressed, except for the hat.
  2. Have a friend or parent draw two lines over the chest of the shirt and the STARS badge on the right shoulder. For reference on the badge, Google it! ^^
  3. Get some pieces of cardboard or posterboard and drape them over your shoulders. Logos or any type of print should be pointing down. Once you get the desired length, cover them in duct tape or paint them with dark blue. If you painted them, leave the pieces to dry, finish them with a couple dots of silver paint and leave it again for the silver to dry. If you covered the pieces in duct tape, take a strip of regular duct tape (the original gray/silver), cut out a couple of circles for the studs and place them on the two front corners. Take another piece of duct tape, tape some safety pins to the cardboard and pin it to your shoulders.
  4. Make another STARS badge, but on some paper and for the hat. Once you're done making the badge, Scotch tape some safety pins to the back of it and pin it to the back of the beret (across from the floppy side). Roll up your gloves, get a fake revolver and you're done!
For the middle costume as seen above, just wear a bright blue tube top, a brown skirt and matching brown boots and finish it by wrapping a white sweater around your waist. Hope you enjoyed! ^^

Tomorrow's character: You'll see~ ^w^

Monday, October 29, 2012

13 Cosplays of Halloween - Perona (One Piece)

Day 11! ^^ 2 more days left! Today, we'll be contacting some ghosts because the character of the day is Perona of 'One Piece.' Since the anime is kid-friendly, this can also be used for girls. ^^

Here's Perona pre-timeskip. She'll be our first recipe.

Here's her, post-timeskip. She'll be our second recipe.

What's needed to become the pre-timeskip 'Ghost Princess':
  • A king's crown hat (found at Party City or Spirit)
  • A red cloak (again, found at Party City or Spirit)
  • White and red lace (a thin one and thick one for the red)
  • A white long-sleeved shirt *non-button up*
  • A heart-shaped belt (found at Walmart or online)
  • A red skirt
  • Some white fabric *for the little designs*
  • Striped leggings
  • Red boots (found at Walmart, Kmart, Target, Payless or any shoe store)
  • Pink ribbon
  • Black fabric marker
How to become her:
  1. Take the cloak and put it on. Mark the middle of your biceps using the marker and take off the cloak. Cut off the hood and to where you marked and set it aside.
  2. Now for the shirt! Take the shirt and draw the picture on Perona's onto it. To mark the spot of where to cut it, look at the picture, trace your index finger from the bottom of her chest to where the bottom is and do that to your own at the same time. Once you find it, mark the shirt where your finger is and that's where to cut it. Cut the area where you marked and get ready for the cuffs.
  3. For the cuffs, get some thick red lace, wrap it around a cuff and pin it. It should lightly drape over your wrist. Similar to where to mark the shirt, do the same with your arm. Instead of cutting, put the thin red lace over where you marked. Do the same things to the other cuff.
  4. Time to sew! You can run the larger lace through a sewing machine, but for the smaller ones, I recommend sewing them by hand. When you're done, set it aside.
  5. For the skirt, take the white fabric, draw some flower shapes and swoops and cut them out. Either pin them to the skirt or put some Stitch Witchery underneath them. For the pinned method, run the shapes through the machine or sew them by hand. For the Witchery method, just iron them on.
  6. Do the same thing as you did with the shirt. This time it's from a swoop to the bottom and instead of just a line, draw another swoop. Once you're done, cut away!
  7. Take the cloak you made earlier and pin some white lace to the edges. Again, either run it through the machine or sew it by hand.
  8. Time to get dressed! Put on the shirt, skirt, leggings, boots and cloak. For the cloak, either safety pin a pink bow tie to the pre-made one or tie the ribbon alongside it. Top it off with the hat and you're done!
Now for post-timeskip:
  • A long black sundress (strapped or strapless)
  • White skirt
  • A puffy top hat (found at Party City, Spirit or online)
  • Some fake white roses (found at Michael's, Walmart, Jo Ann Fabrics or any fabric store)
  • Wire stripper (found at Home Depot, Lowe's, Ace, any tool store or just in your toolbox)
How to do it:
  1. Cut up the skirt into two horizontal strips. Then, either pin them to the dress and run them through a sewing machine or place some Stitch Witchery underneath them and iron them on. Hang it up to cool if you ironed it.
  2. Time to work on the hat! Take a wire stripper and strip a fake rose until the stem is bare wire. Take the hat, stick the tip of the wire into the base of the hat and back out, secure it and cut any excess wire. Do the same thing to the rest until the entire base is covered.
  3. Put on the same red boots as the previous Perona recipe and you're done!
If you wanna do the ghosts that fly around Perona, just get some styrofoam balls, wooden dowels, fishing line and white fabric and make them like lollipop ghosts of old. Then use some fabric markers, draw some faces on the formed heads and sew or safety-pin them to the dress. As you walk around, they should 'fly' when they bump into your hips or butt.

Hope you enjoyed! ^^

Tomorrow's character: Jill Valentine (Resident Evil)!

Sunday, October 28, 2012

13 Cosplays of Halloween: Uniforms of the Undead - Rosario+Vampire

Day 10! We finally hit the decade mark, ladies and gentlemen! ^^ Today, we'll be looking at the uniforms of 'Rosario+Vampire.'

Here are the main characters of the show! ^^ Moka (the pink-haired girl) will be an example, but I'll list the rest of the girls' stuff.
Another pic of the cast! A note to everybody: What Moka is wearing is the common uniform for the female characters on the show, but any kind of shoes and socks can be used. ^^

Here's what's needed to make yourself a 'monster' pupil:
  • A brown skirt or dress (a moss green one also works, too!)
  • Skinny yellow ribbon
  • A white long-sleeved button-up shirt (from the Azumanga Daioh outfit)
  • A green jacket
  • White ribbon (might need another roll. ^^;)
  • Sewing machine or Stitch Witchery (again, might need another roll. ^^;)
  • Black fabric marker (I recommend Stained by Sharpie.)
Here's what to turn yourself into a 'bat' girl on campus:
  1. Draw some plaid lines onto the skirt with the fabric marker, take some yellow ribbon and align it with the lines. Cut them to the desired length and pin them to the skirt. Either sew it by hand or run it through a sewing machine. After you're done, set the skirt aside.
  2. Take the jacket and the white ribbon. Cover the front pocket with the Witchery and iron on the ribbon, shiny side up. For the area with the buttons, align the ribbon with the edges, again shiny side up, and cut slits where the holes and buttons are. Run the jacket through the sewing machine and afterwards, sew up any mistakes by hand (i.e. slits around buttons are too big, a bit too much ribbon, etc.).
  3. Do the same thing with the collar, the cuffs and the bottom of the jacket. On the cuffs, make crosses out of ribbon and either sew them on by hand, run them through the machine or iron them on with some Witchery, of course. Once you're done, set the jacket aside.
  4. Put on the shirt and get the rest of the uniform on, including whatever socks and shoes you want. You're done!
For Mizore:
  • A black tank or a black bra
  • A white kangaroo hoodie *it's the one with a single pocket in the front!* (much like Kaede, make sure it's a little big so it'll expose your shoulders a little.)
  • Bright purple long socks
  • A brown belt
  • Purple cloth dye
  • Rubber bands
  • Turquoise or ice blue ribbon
  1. Make the dye first. This will be used to make the sleeves on the hoodie purple.
  2. Put on the tank and tie the hoodie sleeves with the rubber bands. Do the same with the socks, but make them like Jasmine's ponytail. (little 'Aladdin' ref! >w<)
  3. Dip the sleeves into the dye and hang it to dry. Do the same with the socks, but dip them in a stripe pattern (dye, leave alone, dye, leave alone, etc.) until they're done.
  4. Once the dye on the hoodie is dry, place the blue ribbon on the bottom and run it through the sewing machine. You can also use the Stitch Witchery under the ribbon and iron it on, shiny side up.
  5. Run some ribbon over the two openings of the pocket and pin the two strips to the openings. Highly recommend sewing them on by hand, since ironing them on or running them through the sewing machine may result in closing up the pocket.
  6. Check if the socks are dry. If they are, then put them on, along with the tank, skirt, belt and some white shoes. Put the hoodie on, too, but tuck in the hood and adjust it so your shoulders can be evenly visible. Spray your hair with bright purple color hairspray and you're done!
For Kurumu, leave the long-sleeved shirt from Moka, substitute the green jacket with a yellow tank, use some schoolgirl socks (found commonly online) and some loafers and finish it off with a red bow tie.
For Yukari, use a brown tube top, white long socks, the same loafers, a black cloak and a witch hat (found at Party City, Walmart, Spirit or any costume store) and finish with a yellow bow tie safety-pinned to the cloak's tie.
Hope you enjoyed! <3 And I hope you find your Tsukune...

Next character: Perona (One Piece)!

Saturday, October 27, 2012

13 Cosplays of Halloween - Kaede/Nyuu/Lucy (Elfen Lied)

Day 9, folks! 4 more recipes left! ^^ Today, the character of the day is Kaede/Lucy/Nyu of 'Elfen Lied.' For those who haven't heard of it, Google it since I have no idea how to summarize it, but it IS very violent and dark. This one's gonna be special since there's three forms of her.

Here's Kaede's first form. This will be our first recipe. Many thanks to KomboKitten for letting me use this!

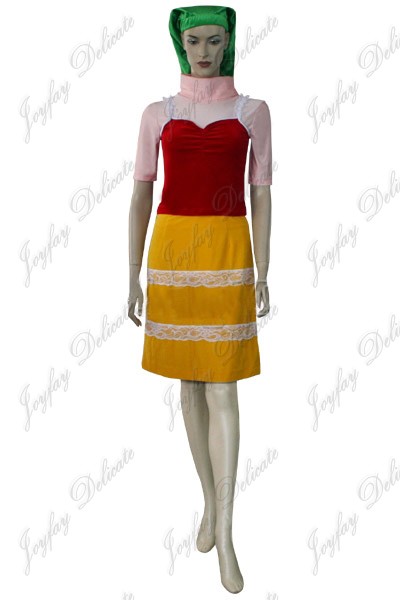
Here's her second form, Nyuu and our second recipe. Many thanks to Joyfay for letting me use this!

Unfortunately, I couldn't find a good picture of her third form, Lucy, but hers is very simple.

Let's start with the materials needed for the first costume, Kaede:
  • A pink short-sleeved shirt (make sure it's a little big so it hangs off your shoulders a little.)
  • A little black dress with straps
  • Gray and black striped socks or legwarmers
  • Red high heels
  • Silver or light purple ribbon (found at Michael's, Walmart or any fabric store)
  • Skinny red ribbon (Same with the light purple ribbon)
  • Temporary color hairspray in Pink (found at Party City)
Here's what to do:
  1. Put on the shirt and the dress. Tug on the shirt until the shoulders are evenly visible.
  2. Cut the toes off the socks and put them on. Skip the cutting if you have legwarmers.
  3. Slip your feet into the heels. Put on a smock or a work shirt.
  4. Have a parent or a friend spray your hair with the color hairspray. Once it's dry, brush it out.
  5. Get your hair in small pigtails and tie them with the silver or purple ribbon. Brush the tails to blend them into your hair and you're done!
Now, onto Nyuu. What's needed:
  • A green jester hat (found at Party City and online)
  • A red spaghetti-strap top
  • A pink turtleneck shirt (Make sure the sleeves are rollable!)
  • A yellow skirt
  • White lace (found at Michael's, Walmart or any fabric store. Usually sold with the ribbons.)
  • Sewing machine or Stitch Witchery
  • Fabric pen (for the skirt)
  • Pom-poms (also found at Michael's, Walmart or any fabric store. Sold with the crafts.)
How to make it:
  1. Take the skirt and draw where you want to iron or sew the lace. For those who want to iron on the lace, place the Witchery over the lines, put the lace over the Witchery and iron away! For those who prefer to sew, just pin the lace onto the lines and run it on a sewing machine. Hang up the skirt and set it aside.
  2. Now for the spaghetti-strap tank! It's better to sew the lace on this one by hand because with a machine or the Witchery, there's a small chance of screwing up and accidentally ironing or sewing the straps together. Afterwards, hang the tank up and set it aside.
  3. Time to do the hat! Just take an all-green jester hat and cut off all of the spikes, but leave only two. Sew up any stubs left by the severed spikes.
  4. Cut off anything at the ends of the remaining two spikes. If there are any white puffy balls at the ends (think 'Santa hats'), leave them alone and dye them green with any kind of green Kool-Aid. If not, sew some large green pom-pom balls at the ends. Again, hang it and set it aside.
  5. Put on the turtleneck shirt, roll up the sleeves and get dressed. Put on the hat as a finishing touch and you're done!
For Lucy, just put on a white strapless bra and a pair of white undies, wrap them with nonstick white bandages (commonly found at Walgreen's, Rite Aid and any drugstore) and splash some fake blood (found at Party City and Spirit) on it. As for the mask, get a Bumblebee (Transformers) face mask, have someone cut it down the middle in half and cover it in duct tape. Hope you enjoyed! <3

Tomorrow's character: Yokai Academy uniform (Rosario+Vampire)!

Friday, October 26, 2012

13 Cosplays of Halloween: Uniforms of the Undead - Soul Reaper (Bleach)

Day 8! ^^ It's 'Uniforms of the Undead' again! Today, it's the Soul Reaper robes from 'Bleach.' This one's pretty much simple since it's just a black robe lined in white.

Here's Ichigo of the show. We'll use him as an example for this.

Here's Rukia. She'll be an example too.

What's needed to dress like a Soul Reaper:
  • Black robe
  • White ribbon
  • White belt (if you've done karate)
  • Stitch Witchery
  • Ninja sword (found at Party City, Walmart or just about any toy store)
How to do it:
  1. Turn the robe inside-out and iron the ribbon to the cuffs and collar. Make sure the ribbon is visible when you put it on. Have an adult do this for you if you're younger. Hang it up afterward so it can cool.
  2. Once the robe is cooled, put it on and get your white belt. If you've done karate, just use your white belt from that. If not, use white ribbon. Tie either into a bow.
  3. Strap the ninja sword on either your side or your back, get some white socks and some sandals on and you're ready to slay some Hollows!
Hope you enjoyed! ^^

Tomorrow's character: Lucy (Elfen Lied)

Thursday, October 25, 2012

13 Cosplays of Halloween - Shion Sonozaki (Higurashi)

Day 7! ^^ Today, the character of the day is Shion Sonozaki of 'Higurashi.' What's 'Higurashi' you may ask? Well, it's pretty much about the lives of these kids who live in a town cursed with a disease called Hinamizawa Syndrome, which causes the townspeople to be paranoid, homicidal and suicidal.

Here's what we'll use for this recipe. Sorry, but I couldn't find any clear pictures of her and her 'off' outfit. ^^;

What is needed (for this one, you can choose either a wig or the spray):
  • A white Polo shirt (from the Kilala Princess uniform)
  • Gray and black striped ribbon (commonly found at Michael's, Walmart or any fabric store that sells ribbon)
  • A blue skirt
  • Black socks
  • Black or dark loafers
  • Temporary color hairspray in Lime or Mint (found at Party City and online)
  • Wig (found commonly online)
  • Skinny yellow ribbon (again, found at Michael's, Walmart or anywhere that sells ribbon)
 How to get dressed (Don't worry, you won't go insane on this. ^^):
  1. Put on the skirt and the shirt. We'll save the gray ribbon, the shoes and the socks for later.
  2. For those who have a wig, put on a wig cap and grab your wig. Brush the strands until you get your desired look.
  3. For those who don't, straighten your hair. Afterwards, let your hair cool and apply the hairspray. Let the spray dry.
  4. After the spray is dry, brush it out.
  5. Grab a pinch of hair and tie it together with the yellow ribbon. It should look Belle-like on the side.
  6. Get your socks and shoes on, take off the smock or work shirt, tie the gray ribbon on the collar of the shirt and you're done!
If you wanna carry a weapon, get a fake bloodied knife or machete (found at Party City). Hope you enjoyed~ <3

Tomorrow's character: Soul Reaper robes (Bleach)