Thursday, December 17, 2015

No "12 Cosplays" this year...

My many apologies, folks, but I will not be doing "12 Cosplays of Christmas" this year. I know it's as traditional as eggnog and gingerbread ever since I started this blog. However, I have so much going on right now with the holidays coming near.
  1. I just got a new job at the local commissary.
  2. My folks and I are leaving both this weekend and next weekend (Christmas weekend) for family visits.
  3. I'm constantly forgetting I have a laptop, so I just leave it to collect dust...
I will meet you all next year with my annual double-post Valentine's recipes. Again, because of my holiday schedule and some new things going on in my life, I won't be doing 12 Cosplays of Christmas 2015. My heart and many prayers off to my beloved fans during this dark time. One more thing before I wrap this up...

Have a Merry Christmas 2015 and a Happy New Year 2016!!! *<^(w)^ .o*

Saturday, October 31, 2015

13 Cosplays of Halloween 2015 - Dr. Stein (Soul Eater)

Day 13! ^^ Our last recipe for 13 Cosplays of Halloween 2015! Before we pull the plug on this for another year, let's start one more spark with Dr. Stein from "Soul Eater!"

Here he is! ^^

What you need to assemble him:
  • A short gray wig
  • A gray headband
  • Fake round glasses
  • A skinny black PVC pipe
  • Thick cardboard
  • A white lab coat
  • A gray turtleneck
  • Gray or black pants
  • Gray shoes
  • Glue
  • Any type of black tape (electrical, Gorilla, etc.)
  • A black eyeliner pencil or facial crayon
How to assemble him:
  1. Cut up the cardboard into a couple of circles and cut a bar through one of them. Glue the halves onto the other and leave it to dry. This will make the top of the flathead screw.
  2. Cut a portion of the PVC pipe. Cut that portion in half and glue the halves and the cardboard screwtop to the headband. Once the glue's dry, wrap them in tape.
  3. Now for the clothing! Get dressed and get the wig on.
  4. Draw some scars on yourself, slip on the glasses and the headband, spread out the hair and now you're done!
Now, I'll take a month long break to plan my recipes for December. So to close this up, hope you've enjoyed this recipe and 13 Cosplays of Halloween 2015! One more thing...

Havehappy Halloween! ^w^

Friday, October 30, 2015

13 Cosplays of Halloween 2015 - Yuno Gasai (Mirai Nikki)

Day 12! ^^ 1 more recipe left! Today's gonna be a bit messy because it's Yuno Gasai from the popular "Mirai Nikki!"

 
Here she is! ^^

What you need to assemble her:
  • A pink straight wig
  • Hair ties
  • A white polo shirt
  • Pale pink ribbon
  • A blue plain t-shirt
  • A dark blue skirt or dress
  • White socks
  • Brown shoes
How to assemble her:
  1. Get dressed, like you would with any previous uniform.
  2. Put on the wig and style it to Yuno's style.
  3. Slip on the shoes, grab a fake knife and now you're done!
Hope you enjoyed! ^^
Next character: You'll see...

Thursday, October 29, 2015

13 Cosplays of Halloween 2015 - Jon Talbain (Darkstalkers)

Day 11! ^^ 2 more recipes left! Today, I cater to my lycan-loving viewers because it's Jon Talbain from "Darkstalkers!"

Here he is! ^^ Many thanks to the Darkstalkers Wiki for letting me use this!

What you need to assemble him:
  • Blue and white faux fur
  • Yellow ribbon
  • Old jeans
How to assemble him:
  1. Look up a wolf fursuit tutorial and follow the instructions.
  2. Slip on the pants and tie the ribbon around your waist like a belt.
  3. Slip on the shoe covers (if you did any), slip on the head and now you're done!
Hope you enjoyed! ^^
Next character: Yuno Gasai (Mirai Nikki)!

Wednesday, October 28, 2015

13 Cosplays of Halloween 2015 - Valentine (Skullgirls)

Day 10! ^^ 3 recipes left! Time to roll up our sleeves and get your shot because today, it's Valentine from "Skullgirls!"

Here she is! ^^ Many thanks to the Shoryuken Wiki for letting me use this!

What you need to assemble her:
  • A nurse's hat
  • A short blue wig
  • A dust mask
  • A black choker
  • A white button-up dress
  • White gloves
  • Bandages
  • White flats
  • Cardboard
  • Safety pins
  • Duct tape in red
 How to assemble her:
  1. Cut up some of the cardboard into some X shapes and wrap them up in the duct tape.
  2. Get dressed, alongside the dust mask and gloves. Undo how many buttons, depending on how much cleavage you want to show.
  3. Wrap up your calves with the bandages. Safety pin the cardboard onto the top of them, put on the hat and flats and now you're done!
 Hope you enjoyed! ^^
Next character: Jon Talbain (Darkstalkers)!

Tuesday, October 27, 2015

13 Cosplays of Halloween 2015 - Whomp (Super Mario)

Day 9! ^^ 4 more recipes! Today's gonna be a bit rocky because it's the Whomp from the "Mario" series!

Here it is! ^^ Many thanks to the Mario Wiki for letting me use this!

How to assemble it:
  • A cardboard box (Preferably one from a TV or any large appliance)
  • A box cutter
  • A pair of scissors
  • Duct tape in standard grey
  • Duct tape sheets in red, white and black
  • Grey clothing (i.e. sweatpants, Under Armour clothes, etc.)
  • Grey gloves
  • Grey shoes
  • A marker (Can be Sharpie or whatever you like)
How to assemble it:
  1. Let's start with the box. Cut off the flaps and start wrapping the box with the grey duct tape.
  2. Somebody can mark where your eyes and arms are with the marker. Slip out and cut out the holes they made.
  3. Cut up the tape sheets for the Whomp's facial components (eyes, mouth, teeth, etc.) and stick them on there. Using the box cutter, cut any tape over the holes. You can either tuck them in the box and stick the remains inside or just cut out the remaining tape altogether.
  4. Slip into any grey clothing you have, slip on the gloves and the box and now you're done!
Because of the size of the costume, this is best for if you're gonna pass out candy rather than being at a party or with a bunch of kids. Hope you guys enjoyed!
Next character: Valentine (Skullgirls)!

Monday, October 26, 2015

13 Cosplays of Halloween 2015 - Jyabura (One Piece)

Day 8! ^^ Down to the final 5 recipes! Anyway, I have another recipe for my fellow fans of werewolves with Jyabura from "One Piece!"

Here he is! ^^

And here he is sleeping. ^^ Many thanks to the One Piece Wiki for letting me use both this and the above pic!

What you need to assemble him:
  • Purple rubber bands
  • Cat-eye sunglasses with purple lenses
  • Eye pencils and shadows in brown and black
  • A thin black coat
  • White ribbon
  • Black pants
  • A red sheet
  • Black flats
How to assemble him:
  1. Zip up the coat, measure out the ribbon and cut each strip. Pin them down and run it through the sewing machine.
  2. To make Jyabura's scar, look up pictures of him. Draw it over your left eye with the brown pencil and using the brown shadow, fill it in. Do the same thing for the facial hair and the black pencil and shadow.
  3. Get dressed. Twist the sheet, tie it around your waist and have somebody trim the tails to the desired length.
  4. Grab a chicken plush if you want and now you're done! 
Hope yooooou enjoyed! ^^
Next character: Thwomp/Whomp (Mario)!

Sunday, October 25, 2015

13 Cosplays of Halloween 2015 - Orochimaru (Naruto)

Day 7! ^^ We just hit the week mark! Today, let's head back into the lair of the serpents because it's Orochimaru from "Naruto!"

Here he is! ^^

How to assemble him:
  • A black straight wig
  • A black turtleneck shirt
  • An oversized gray nightshirt
  • Thick purple rope
  • Gray pants
  • A roll of bandages
  • Black sandals
  • Black and gray face paint
How to assemble him:
  1. Get dressed.
  2. Put on the nightshirt and have somebody draw an A-shape up to your waist. Cut it out.
  3. Starting from under your calf muscles to your ankles, wrap the bottom of your pants. Put on your sandals.
  4. Put on the nightshirt and tie the desired amount of rope around your waist (Not too tight!).
  5. Paint your face gray, use some black eyeshadow for his snake eyes and now you're done!
Hope you all enjoyed! ^^
Next character: Jyabura (One Piece)!

Saturday, October 24, 2015

13 Cosplays of Halloween 2015 - Papi (Monster Musume)

Day 6! ^^ Let's fly high because today it's Papi, also from "Monster Musume!

Here she is! ^^

Here's what you need to assemble her:
  • A short blue wig
  • A black or dark blue halter top
  • Khaki shorts (Not too short!)
  • Tall gold gladiator sandals
  • Light blue dress gloves
  • Matching light blue sheets
How to assemble her:
  1. Draw a wing shape onto the sheets. Cut it out and sew it to the underside of the gloves.
  2. Get dressed.
  3. Get the sandals and wig on and now you're done!
Hope you all enjoyed! ^^ Just don't try to fly...
Next character: Orochimaru (Naruto)!

Thursday, October 22, 2015

13 Cosplays of Halloween 2015 - Sunset Shimmer (MLP: Equestria Girls)

Day 5! ^^ Let's head into the library because the spotlight is on Sunset Shimmer from "MLP: Equestria Girls!"

Here she is! Many thanks to the Villains Wiki for letting me use this!
Here's what you need to assemble her:
  • A gold-yellow wig
  • Red colored hairspray
  • A black mini jacket
  • A Bedazzler
  • A purple shirt
  • An orange skirt
  • Black boots
  • Purple felt
  • A hot glue gun (Be careful!)
How to assemble her:
  1. Take the wig and spray the red hairspray from a distance. You may need to wear a smock or an old shirt so the hairspray can't stain your clothes.
  2. If the jacket doesn't have studs in it already, install some along the collar using the Bedazzler.
  3. Now for the boots! Warm up the hot glue gun and cut up some of the purple felt. Carefully drizzle the glue onto the fabric and place it over the boots. Once you're done, set the boots aside and leave them to both cool and dry.
  4. Get dressed. Check on the wig to see if the spray is dry. If so, put the wig on and gently brush it out.
  5. Grab your boots and now you're done!
Hope you enjoyed! ^^
Next character: Papi (Monster Musume)!

13 Cosplays of Halloween 2015 - Miia (Monster Musume)

Day 4! ^^ Today, let's bring out some rats and frozen mice because it's Miia from "Monster Musume!"

Here she is! ^^ This will be the model for this recipe. Many thanks to the Monster Musume Wiki for letting me use this!

What you need to assemble her:
  • A long orange straight wig
  • A dress shirt
  • A belt
  • A skirt
  • Pink scales-print fabric
  • Light pink fabric
  • Pillow stuffing
  • Barrettes
  • Yellow craft foam
How to assemble her:
  1. Get dressed.
  2. Look up a snake pattern or a mullet skirt pattern online. For the mullet skirt, the back has to be crafted longer than normal to give the illusion of a snake tail.
  3. After you're done crafting the tail, sew the sides of the back together and make the smooth underside using the light pink fabric. Bring out the pillow stuffing and begin stuffing the tail.
  4. Cut up the foam into a few D shapes and open the barrettes. Glue on the foam and let the glue dry.
  5. Adjust the wig if you have one. You can also spray your hair orange if you have lighter hair.
  6. Check on the barrettes. If the glue's dry, clip them on, style your hair and now you're done!
Hope you enjoyed! ^^
Next character: Sunset Shimmer (MLP: Equestria Girls)!

Wednesday, October 21, 2015

13 Cosplays of Halloween 2015: Uniforms of the Undead - Organization XII robes (Kingdom Hearts)

Day 3! ^^ Prepare to polish your Keyblades, folks, because today, we'll make the robes of Organization XIII from "Kingdom Hearts!"

Here's one of them! ^^ Many thanks to the Kingdom Hearts Wiki for letting me use this!

Here's what you need to assemble it:
  • A long coat with a bare hood (Bare meaning no fur, no designs, nothing!)
  • Black pants
  • Black shoes
  • Black gloves
  • A silver necklace
  • Any wigs or makeup (if you plan to do a certain member)
How to assemble it:
  1. Get dressed, save for the coat.
  2. If you prefer to make the coat from scratch, grab a wizard or hooded costume pattern (Simplicity, Butterick, etc.) and follow it. If you prefer to make it quick, grab a long hooded coat.
  3. If you wanna be a specific member (i.e. Axel, Larxene, Xaldin, etc.), do some makeup, whether it be face paint or standard makeup.
  4. You may also need to get a wig or some colored hairspray for the hair. You know the drill on this one.
  5. Put on the wig, the coat and the necklace and now you're done.
 Hope you guys enjoyed! ^^
Next character: Felicia (Darkstalkers)!

Tuesday, October 20, 2015

13 Cosplays of Halloween 2015 - Zakuro Fujiwara (Tokyo Mew Mew)

Day 2! ^^ Now for this year, I thought, "I've covered vampires and zombies in the previous years. So why don't I cover werewolves this year?" So to cater to my fans of the lycanthropes, I'll start off with Zakuro Fujiwara from "Tokyo Mew Mew!"

Here she is! ^^ Many thanks to CosplayHouse for letting me use this!

Here's what you need for her:
  • Gray faux fur
  • White lace
  • Purple ribbon
  • Velcro
  • Purple spandex or any stretchy material
  • Elastic
  • A purple tube top
  • Purple shorts
  • A purple garter belt
  • Purple wristbands
  • Purple thigh-high boots
How to assemble her:
  1. Measure out how much lace you'll need for the top. Afterwards, take some pins and pin the lace down. Have somebody either sew it on with a sewing machine or glue it on with hot glue. Careful if you're using hot glue for obvious reasons.
  2. For the ears and tail, look up a tutorial on how to make them. Or if you already have a tail and a pair of matching cat ears, you can use those instead.
  3. Now for the armbands! Take some of the spandex and cut it up. Place the lace first and the elastic next, pin them down and sew them with a sewing machine.
  4. For the pendant, wrap the ribbon around your neck loosely and cut the desired length. Repeat step 3. Afterwards, measure out the Velcro at the ends of the necklace and stick it on.
  5. Get dressed. Check on the glue if it's dry and cool. If it is, then put it on.
  6. Slap on the wristbands, the ears and the tail and now you're done!
I'm doing a few more lupine costume posts later on this year, so stay tuned. ^^ Hope yoooooou enjoyed!
Next characters: Organization XII uniforms (Kingdom Hearts)!

Monday, October 19, 2015

13 Cosplays of Halloween 2015 - Dazzlings (Equestria Girls: Rainbow Rocks)

Hey, everybody! ^^ Bri here. Time to bring out the jack-o-lanterns and those full-size bars because it's 13 Cosplays of Halloween time again!! As I mention every year, these recipes are not just for conventions in October. They're also for those who want to add a pixely or otaku-y touch to their Halloween.

Let's bust a jam to start this off because it's the Dazzlings from "My Little Pony: Rainbow Rocks!"

Here they are! ^^ Left to right: Aria Blaze, Adagio Dazzle and Sonata Dusk.

Another shot of them! ^^ Many thanks to the MLP Wiki for letting me use this and the picture far above!

First, let's focus on the leader Adagio. Here's what you need for her:
  • An orange curly wig
  • Yellow, gray and white face paint
  • A light purple vest and matching jeans
  • A dark purple strapless top or tank top, matching shorts and boots
  • Gold anklets
  • A gold belt
  • Light purple fingerless gloves
  • A black scrunchie
Now for Sonata Dusk:
  • A light blue straight wig
  • Blue, gray and white face paint
  • A maroon dress shirt
  • Pink or purple spiked bracelets
  • A pink skirt
  • Pink and white boots
  • A dark blue hair tie or scrunchie
Finally, for Aria Blaze:
  • A purple straight wig
  • White craft foam
  • Barettes
  • A denim vest
  • Hair ties
  • Scissors
  • A white tank top
  • A purple belt
  • Purple jeans
  • Matching boots
  • A safety pin
How to assemble them:
  1. Get dressed.
  2. Mix a couple of the face paints and apply the mix onto your face. Repeat for the eyeshadow, but mix in the gray paint.
  3. For those who want to be Aria, make several stars and glue a few onto some barrettes. Place them stars-down and leave them alone to dry.
  4. Apply the wig and style it to any of the girls' hairstyles. How to do each of them will be at the end of this post.
  5. Now for their pendants! Just get a vampire choker and put it on.
  6. Put on the respective accessories and now you're done!
Now, before I end this, a few notes for step 3:
  • For Adagio, put it in a high ponytail, fluff it out and adjust the bangs.
  • Repeat for Sonata, but don't fluff the ponytail.
  • For Aria, part the hair, put the hair into pigtails and leave a bit of the hair ties loose. Clip the barrettes onto the loose loop.
Hope you enjoyed, folks! ^^
Next character: Zakuro Fujiwara/Renee Roberts (Tokyo Mew Mew/Mew Mew Power)!

Tuesday, September 8, 2015

Many apologies!

Hey, guys! Bri here. I deeply apologize for not posting my annual Back-to-School recipes, but I was extremely busy and I guess... I forgot about them. I'm moving the uniforms I picked to my 12 Cosplays of Christmas event.

I'm working on the recipes for 13 Cosplays of Halloween right now. Again, I'm sorry for no school uniform recipes.

Sunday, April 5, 2015

Easter 2015 - Cream the Rabbit (Sonic)

Hey, guys! ^^ Bri here. Here's that Easter recipe I promised to make up for the lack of a St. Patty's one! Today is gonna be a bit bouncy because it's Cream the Rabbit from the "Sonic" series!

Here she is with Cheese! I guess? Many thanks to the Nintendo Wiki for letting me use this! ^^

 
What you need to assemble her:
  • A pair of orange rabbit ears (If you can't find any, there are several craft sites that teach you how to make some!)
  • Brown felt
  • Orange eyeshadow
  • A black eyeliner pencil
  • An collared sleeveless dress in orange
  • White gloves
  • Blue ribbon
  • Gold cufflinks
  • White socks
  • Orange and yellow shoes
How to assemble her:
  1. Get dressed.
  2. Measure out some of the ribbon and cut it to the desired length. Tie it under the collar. Not too tight, though!
  3. Put on the makeup, the ears and the accessories. Put on the shoes and now you're done!
So there you go, guys! ^^ Hope you enjoyed and...

Have a happy Easter! =^v^=

Tuesday, March 17, 2015

Sorry, guys!

Hey, guys! Bri here. I regret to inform you all that there's no St. Patrick's Day recipe this year.
  • My internet's been acting wonky lately.
  • I've been busy with my dad's new garden and my regular stuff, such as errands and whatnot.
So again, I deeply apologize for no recipe today. However, I am making one for Easter, so stay tuned, folks! In my usual manner...

Have a great St. Patrick's Day! [|:3>

Thursday, February 19, 2015

Chinese New Year 2015 - New Zealand (Hetalia)

Hey, guys! ^^ Today, we're trotting out of the Year of the Horse and butting into the Year of the Goat! Or Ram or Sheep, whichever you prefer... ^^; Anyways, in celebration of Chinese New Year (and as a gift of appreciation for my Kiwi viewers), we'll be focusing on New Zealand from "Hetalia!"

Here's a pic of him! ^^ Many thanks to Zerochan for letting me use this!
 
Here's what you need to assemble him:
  • A red blazer
  • A white captain's hat
  • Black pants
  • A white single-strap backpack
  • Gold craft rope
  • Black, red and gold sheets of felt
  • Red and gold ribbon
  • A brown or dirty blonde wig
  • Cool curlers
  • Hairspray
How to assemble him:
  1. Get dressed.
  2. Cut up the felt (i.e. black for the cuffs, gold for the trimming, etc.) and some of the gold ribbon for the blazer and have somebody pin them on for you. Give it to them so they can sew them on.
  3. Meanwhile, measure out the red ribbon for the pants and cut out the desired length. Do the same with the gold ribbon around the hat.
  4. Glue the felt onto the hat and sew the ends of the gold ribbon.
  5. Now for the hair! Put on the wig and with the rollers or your finger, curl part of it. NOTE: Do NOT heat up the roller! Keep it cool! The plastic fibers in the wig can melt and burn you!
  6. Put on some hairspray and once it's hard, remove the roller or your finger.
  7. By then, the jacket might be done. If it is, put it on.
  8. Sew on the rope, put on the backpack, grab a sheep or kiwi plush and now you're done!
Hope you enjoyed and Gong Hay Fat Choy! ^^

Saturday, February 14, 2015

Valentine's Day 2015 - Naruto Uzumaki (Naruto)

Here's part 2, folks! ^^ Time to break out the extra fancy ramen because it's Naruto, also from, well, "Naruto!"

Here's a pic of his Shippuden design! ^^ We'll use this as the model for the recipe. Many thanks to the Naruto Wiki for letting me use this!
 
What you need to assemble him:
  • An orange and black jacket
  • Orange long capris
  • Black sandals
  • A short blonde wig
  • Hair spray or gel
  • Rolled bandages
  • Construction paper
  • An empty toilet paper tube
  • Scissors
  • Packaging tape
  • Small boxes
  • A black face paint crayon
  • A Leaf Village headband in black
How to assemble him:
  1. Make the patch on Naruto's shoulder by cutting out some gray paper and the tube.
  2. Follow the same directions as Hinata, but on the hair, take some gel and sculpt your hair into spikes. Afterwards, leave it to dry.
  3. After the gel is dry, put on the headband across your forehead.
  4. Safety pin the makeshift patch onto your left shoulder.
  5. Now to seal the beast! Not really... ^^; Just take the face crayon and draw on some whiskers on your cheeks.
  6. Slip on the sandals and now you're done!
Join me next week for the Chinese New Year recipe! Hope you enjoyed my first posts of the year and...
Happy Valentine's Day! <3

Valentine's Day 2015 - Hinata Hyuga (Naruto)

Hey, guys! ^^ It's me again. I'm back from New Year's break, so let's focus on the annual double-post Valentine's recipes!

Now, we all know that the Naruto manga ended last year. If not, that's the only spoiler I'll spill to you guys. Anyways, in honor of the wrap-up, I thought I would make today's posts focus on the pairing NaruHina. Not sure what that is? Today's recipes can answer that. ^^

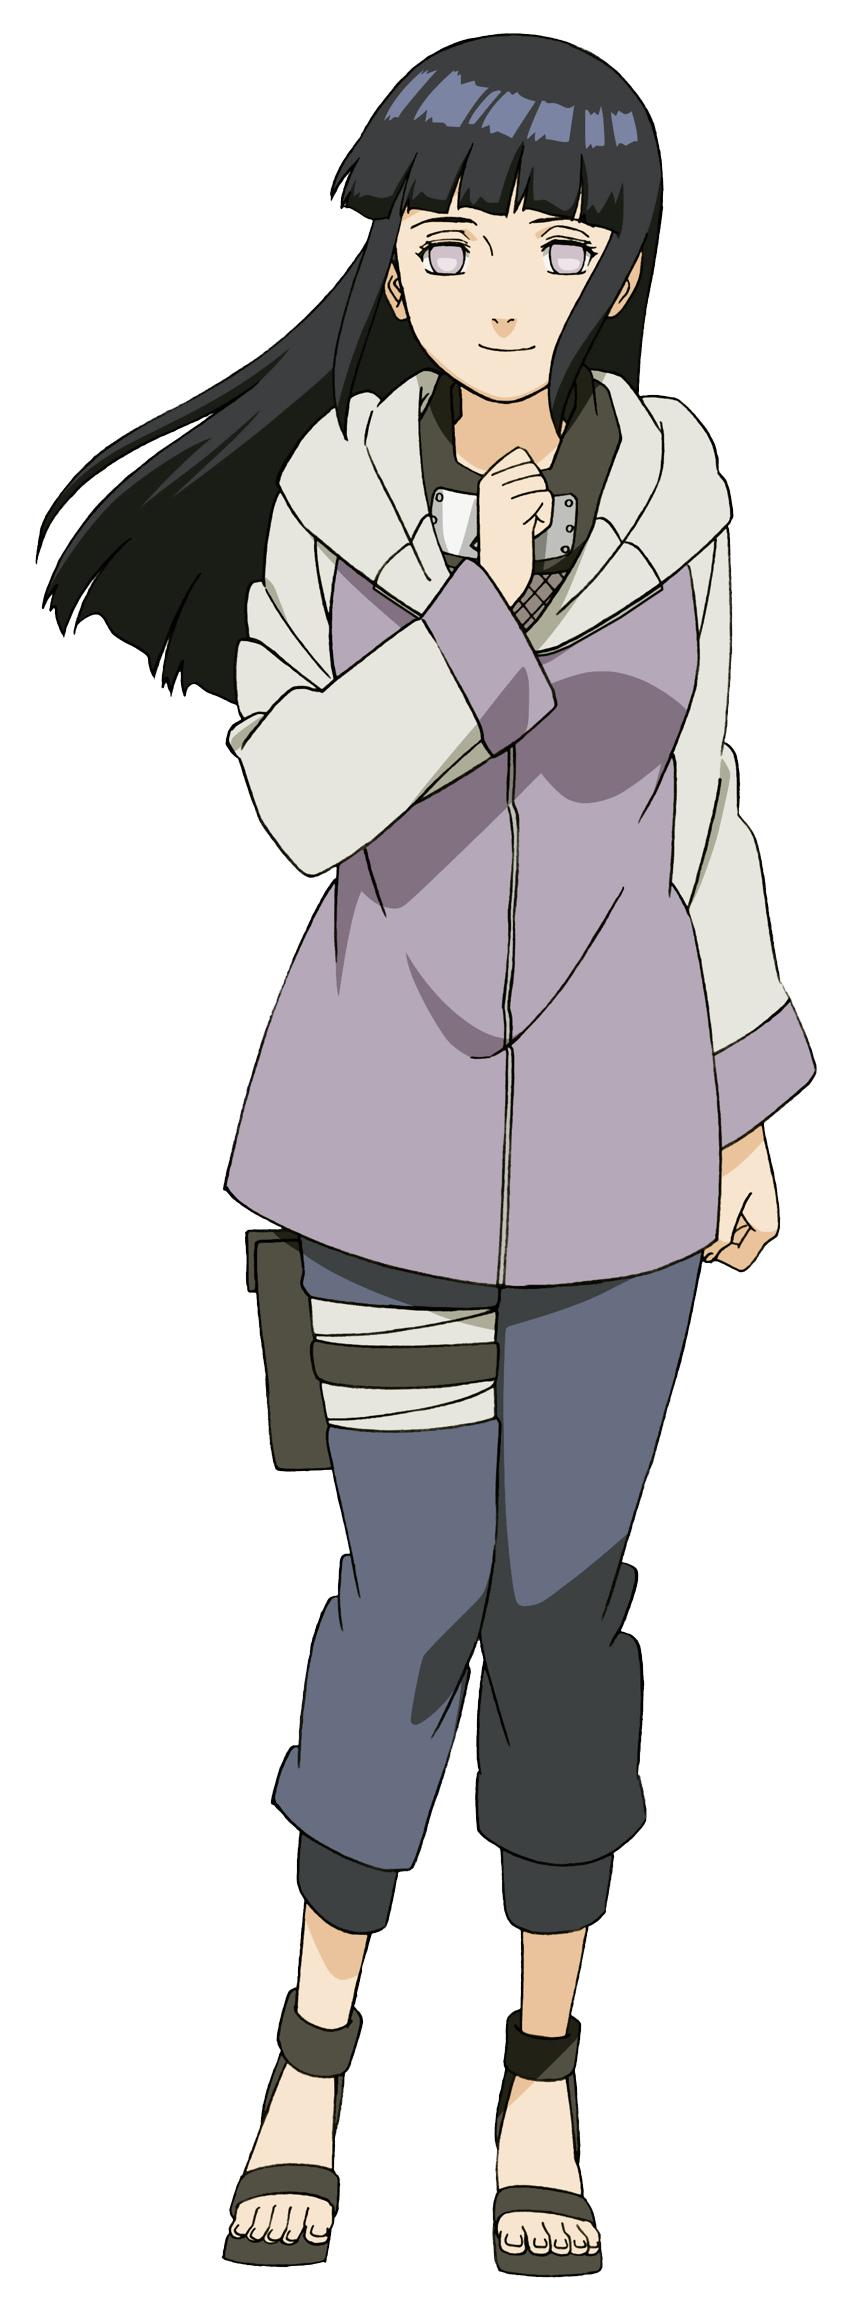
Now, as I annually do it, let's focus on Hinata first. ^^

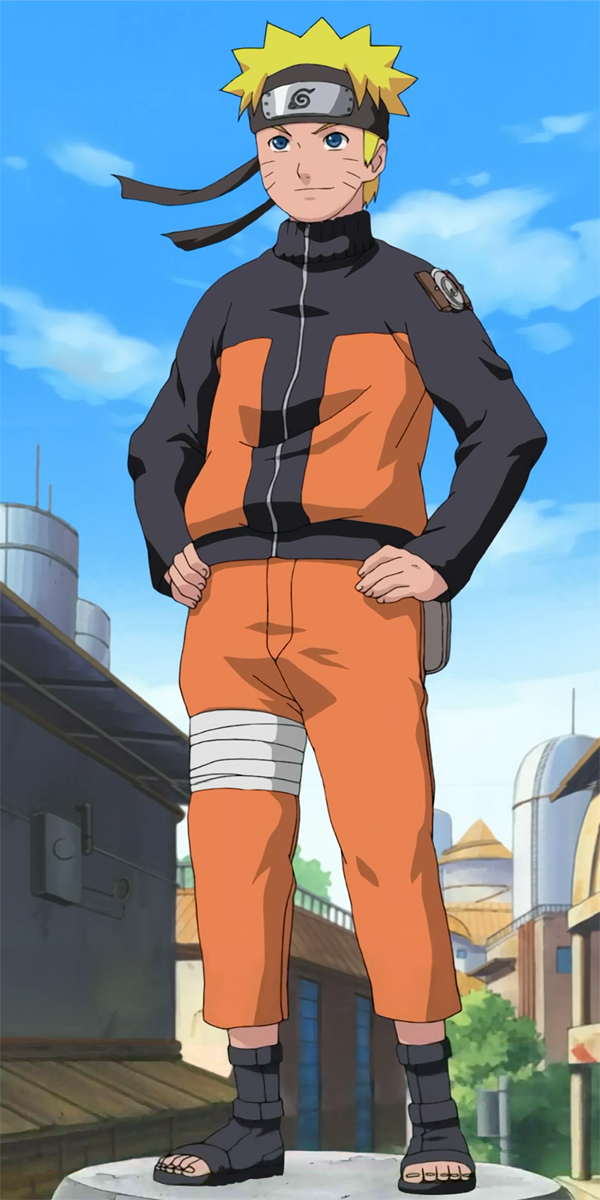
Here's a picture of her! ^^ Many thanks to the Naruto Wiki for letting me use this!
 
Here's what you need for her:
  • A long, straight, black wig
  • Grey or white eye contacts
  • A Naruto headband in black
  • A mesh tank top
  • A purple and gray jacket
  • Capri-style sweatpants
  • Velcro sandals
  • Rolled bandages
  • Black duct tape
  • A small box
  • Scissors
Here's how to assemble her:
  1. Get dressed.
  2. Wrap part of your pants with the bandages. Tie the ends together once you get the desired amount.
  3. Wrap the box in the duct tape and place it over the bandaged area on your outer thigh. Cut some of duct tape and lightly wrap it once around the box.
  4. Now for the tricky part! Put on the contacts carefully and make sure they're comfy on your eyes.
  5. Put on the wig and the sandals and now you're done!
Hope you enjoyed! ^^
Next character: Naruto Uzumaki (Naruto)!